
|
|
|
|
||||||||||
| Xoutpost server transfer and maintenance is occurring.... |
| Xoutpost is currently undergoing a planned server migration.... stay tuned for new developments.... sincerely, the management |
 |
|
|
LinkBack | Thread Tools | Display Modes |
|
#261
 04-11-2024, 04:00 PM
|
||||
|
||||
|
looks great, but needs an additional part...
Quote:
While driving since 1965, I've had a billion stones damage my vehicles, a lower radiator hose and later, a radiator, pierced by road debris. An ounce of prevention is worth a pound of cure.
__________________
01 BMW X5 E53,3.0i-5L40E, 7/13/01 topas-blau,Leder-grau,"resto-project car" Here: 14 Lexus ES350,3.5L-U660E 09 HHR Panel,2.2L-4T45E 04 Chevy 2500HD,6.0L-4L80E 98 GMC Sierra 1500,5.7L-4L60E Gone: 66 Chevelle Malibu 2dr ht.,327>441c.i.-TH350>PGlide/transbrake 08 Cobalt Coupe,2.2L-4T45E 69 & 75 C10s,350c.i.-TH350 86 S10,2.8L-700R4 73 Volvo 142,2.0L-MT4 72 & 73 VW SuperBeetles,1.6l-MT4 64 VW,1.2l-MT4 67 Dodge Monaco 500 2dr ht.,383c.i.-A727 56 Chevy 210 4dr,265c.i.-PGlide 
|
| Sponsored Links | |
|
|
|
|
#262
04-12-2024, 02:40 PM
|
||||
|
||||
|
Quote:
__________________
Current Original owner 2002 E53 X5 4.4i to 4.6i swap 2025 G06 X5 50e Former 1972 Audi Fox 1986 Saab 900S 1996 BMW Z3 1998 BMW E36 M3 Sedan 2004 BMW E46 M3 2006 Audi A3 Quatro 1993 Mopar 318 Jeep Grand Cherokee 2015 V6 Jeep Grand Cherokee
|
|
#263
04-27-2024, 09:08 PM
|
||||
|
||||
|
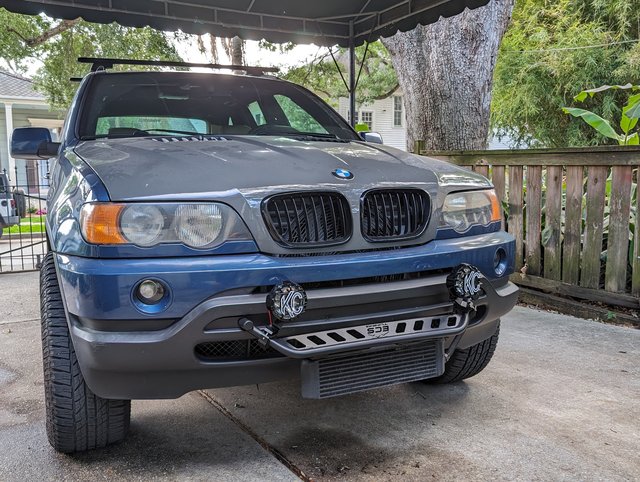
Lights and clamps showed up and I had a few minutes to bolt them up. Initially I envisioned them hanging down from the bar, but I think this looks better, and Im not sure they are weather proof installed upside down.
 Next job is to wire them up.
__________________
Current Original owner 2002 E53 X5 4.4i to 4.6i swap 2025 G06 X5 50e Former 1972 Audi Fox 1986 Saab 900S 1996 BMW Z3 1998 BMW E36 M3 Sedan 2004 BMW E46 M3 2006 Audi A3 Quatro 1993 Mopar 318 Jeep Grand Cherokee 2015 V6 Jeep Grand Cherokee Last edited by Henn28; 05-17-2024 at 07:25 PM.
|
|
#264
05-17-2024, 07:24 PM
|
||||
|
||||
|
wiring complete
I'd procrastinated enough so between rain storms today I wired up the KC Rally 400 halogen lights previously installed. They are 4" lights, which I felt would be plenty, and not overly out of place on the X5, but they may be a bit small. Fortunately the hard work is done and swapping them out should be easy. I like the 4" lights as the bodies are powder coated aluminum. Most other 6" lights by KC, Hella, etc. have plastic bodies.
My initial thought was to have someone 3d print an insert for the ashtray that would hold a rocker switch and the two USB plug ends to/from the audio head unit that currently terminate in the ash tray. A bridge too far for my one brain cell. Fortunately the switch that comes with these KC lights fits perfectly in the cigarette lighter frame, once it is drilled out. The wiring harness for the Rally 400 lights doesn't have a relay (initially I thought it did), but rather a 15 amp fuse in line. The harness has a convenient plug in the middle so I was able to route and plug in the lights, then route the other half of the harness from into the car via a convenient hole (plug had long ago fallen out) next to the hood latch cable firewall hole. 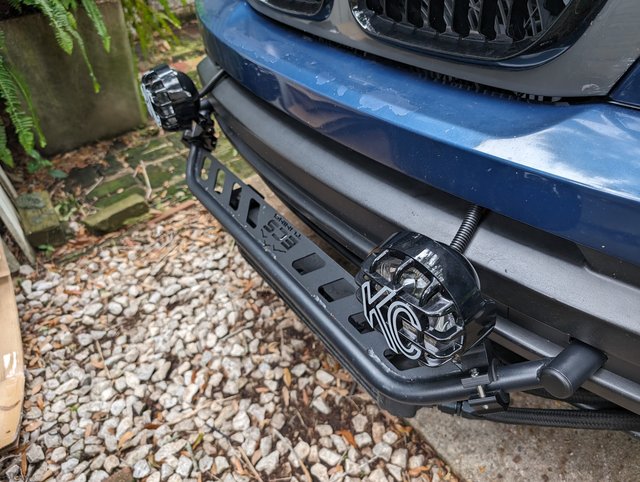 Staying on this side of the car allowed me to connect directly to the battery at the terminal post by the brake booster, and the negative jump terminal by the oil filter housing. Then it was just a matter of plugging the two halves of the harness together and doing some clean up with with zip ties and wire conduit. I ran the wires out of the cowl at the rubber plug on the left side that allows a large wire bundle and the hood cable to exit into the engine bay. Still a little clean up to do with the routing and tiding up under the hood. 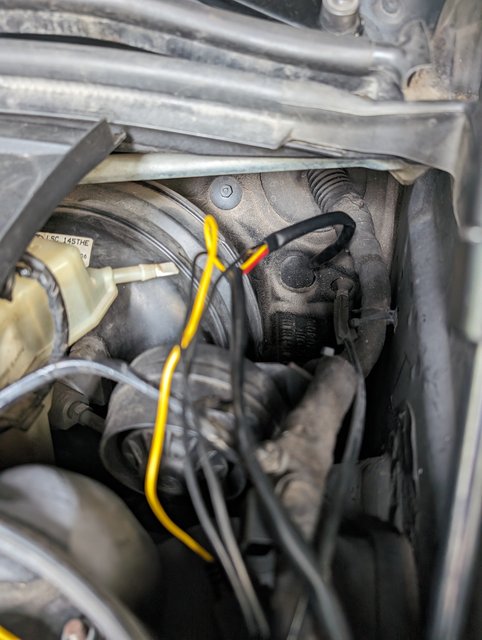 (wire conduit cleans it up somewhat, but I need to sort out that ugly power wire. Its not quite long enough so I will splice in a longer length and route it out of the way I think) 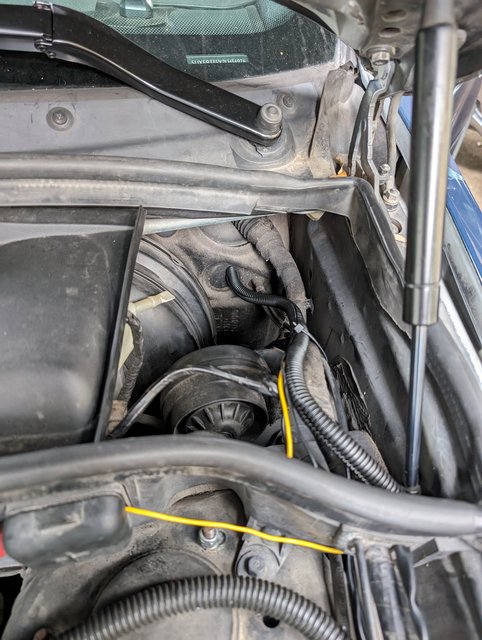 Pulling the covers under the steering wheel and the carpeted cover along the tunnel allowed me to run the harness up to the back of the cigarette lighter and make the connections. with the bottom of the metal housing completely drilled out, the 3/4 switch and 3x connections fit nicely. 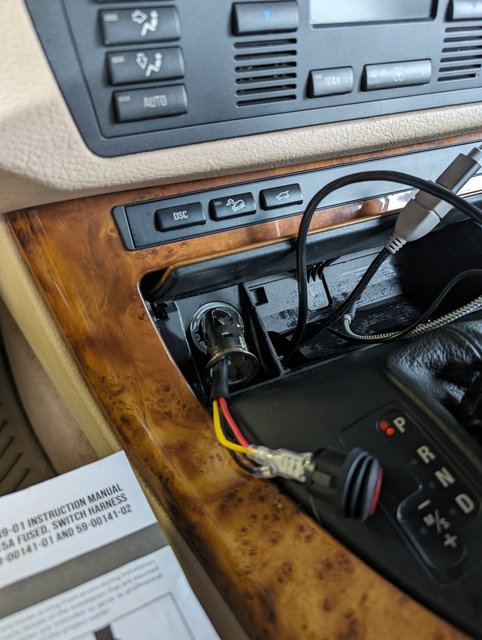 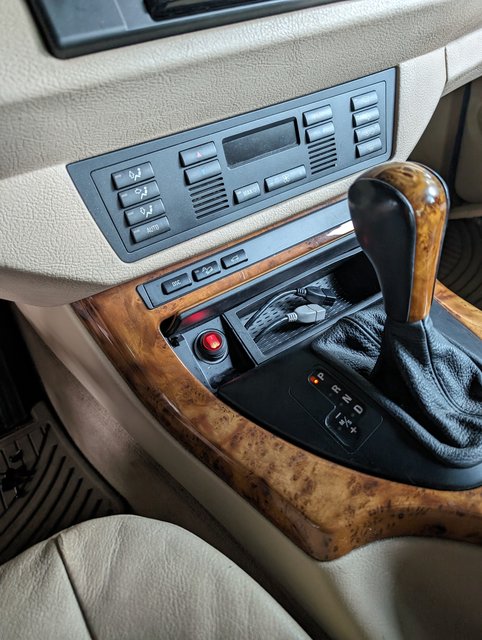 They are on a hot bus right now being wired directly to the battery terminal. the switch lights up though when the are on, and I also ran a wire to the passenger side cigarette lighter (which I think is switched power) so I can more easily wire a relay in if I want larger lights or the added protection of no power with the ignition off. 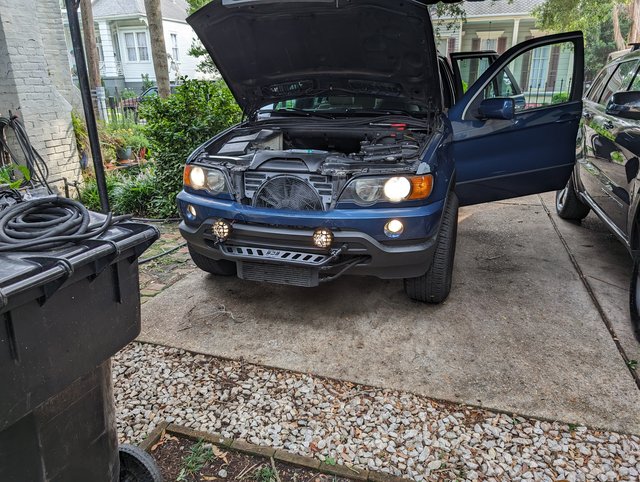
__________________
Current Original owner 2002 E53 X5 4.4i to 4.6i swap 2025 G06 X5 50e Former 1972 Audi Fox 1986 Saab 900S 1996 BMW Z3 1998 BMW E36 M3 Sedan 2004 BMW E46 M3 2006 Audi A3 Quatro 1993 Mopar 318 Jeep Grand Cherokee 2015 V6 Jeep Grand Cherokee
|
|
#265
05-18-2024, 06:21 AM
|
||||
|
||||
|
Quote:
Have you considered the LED lightbar for in between the KC's? Insanely bright and almost cancels shadows when in line with the bar.  Sent from Embassy network using Tapatalk
__________________
"When the Team Chief said.... You're trapped in a hole with nothing but a goat and a slinky, what do you do? Stubby said, I'm not sure but it won't end well for the goat...." ~(Overheard) Last day, Phase 3, Q Course
|
|
#266
05-18-2024, 08:42 AM
|
||||
|
||||
|
Quote:
__________________
Current Original owner 2002 E53 X5 4.4i to 4.6i swap 2025 G06 X5 50e Former 1972 Audi Fox 1986 Saab 900S 1996 BMW Z3 1998 BMW E36 M3 Sedan 2004 BMW E46 M3 2006 Audi A3 Quatro 1993 Mopar 318 Jeep Grand Cherokee 2015 V6 Jeep Grand Cherokee
|
|
#267
05-18-2024, 10:16 PM
|
||||
|
||||
|
Quote:
 Sent from Embassy network using Tapatalk
__________________
"When the Team Chief said.... You're trapped in a hole with nothing but a goat and a slinky, what do you do? Stubby said, I'm not sure but it won't end well for the goat...." ~(Overheard) Last day, Phase 3, Q Course
|
|
#268
09-02-2024, 07:09 PM
|
||||
|
||||
|
The X5 is running strong and (knock on wood) has been a reliable daily driver again. I've got a plenty of "nice to have" stuff I still need to do to it, including trying a 90deg MAP t-stat, reupholstered seats that need to be installed finally and a blower motor R&R that will be nice, once the job is done! No hurry on this last one since it is OK when its warm out but screeches like a cat when the temp drops.
So I finally had some time and energy to begin tearing down the M62TUB44 I took out of the X5 today. Initially I'm interested in seeing if the bores looked good, or were scored. Thankfully my untrained eye tells me that they look good. I've got what look like wear on the walls where the (skirts maybe?) have made 150k miles worth of contact, but other than a slight discoloration, I can't feel a thin with my fingers or nails. I've seen some pics of scored bores on this and other boards, and thankfully I think I missed this problem, which will allow me to proceed with a rebuild. My plan was simply to scrap the motor if a bore(s) were trashed. The motor has been sitting for close to 2 years now (time flies) and was a terrible greasy lump when I wheeled it into the corner of the shop after the swap was complete. I preparation I watched a couple videos on timing chain and head gasket R & R, and figured I'd take lots of pics, bag all the small parts, and see how it went. This will be my first motor rebuild (assuming I don't find any show-stoppers), but the teardown went very quickly. From this: 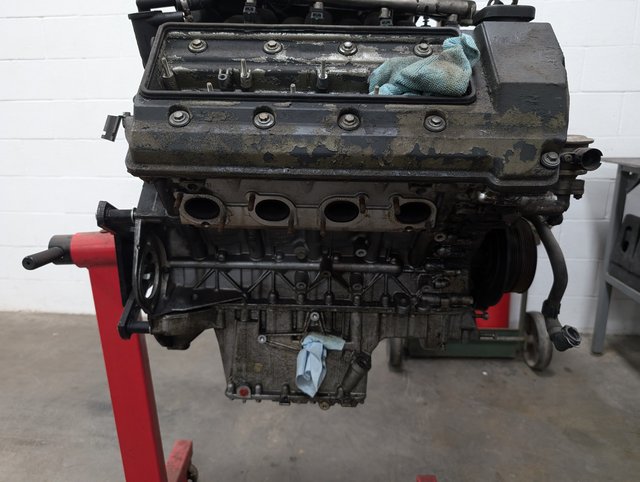 To this in a couple hours:  I pulled the accessories first and while I had already robbed the AC compressor and accessory tensioner for the new motor, I tossed the power steering and water pumps, and hung onto the balancer, pump pulleys, and rear manifold and coolant pipes. I was pleasantly surprised at how clean the coolant passages were.   Next I pulled the valve covers, pried out the vanos seals out, and pulled the front timing covers. The covers are a mess and I'll need to evaluate if they can be salvaged. I've already noticed the covers on my new motor are beginning to "bubble" in a few small spots too. Not sure if this is the magnesium, or paint, or what? Then I pulled the chain tensioner and got enough slack to work the chain off, which is good because I need to buy a socket big enough for the VANOS solenoids. I did first loosen the large nuts on the intake cams thinking the sprockets would slide off and I could get the chain off that way. Fortunately enought he tensioner removal created plenty of slack. The bottom cover is still on, but the parts of the guides I can see look to be in amazing shape considering the car had 160k on it, and i never changed the tensioner. Nor, for the 5 years my kids were driving it was I all that great about changing oil at my normal 4 to 5k interval.  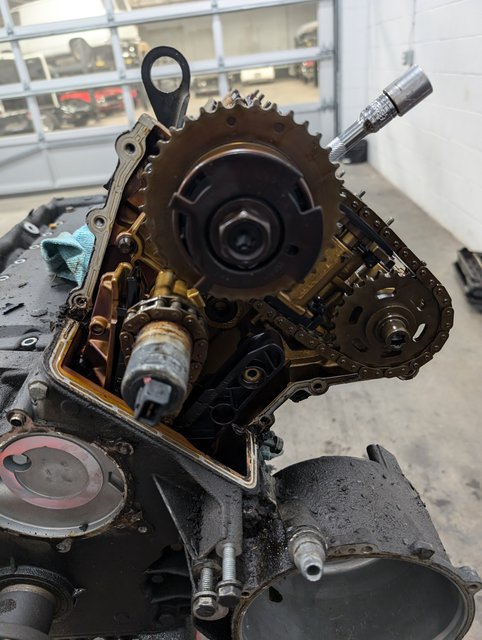 After this work was done it was quick work to zip the head bolts out and pull the heads. Again, not sure what I'm looking at, but the valve train seems very clean while the combustion chambers, like the piston tops, have a lot of carbon build up on them. 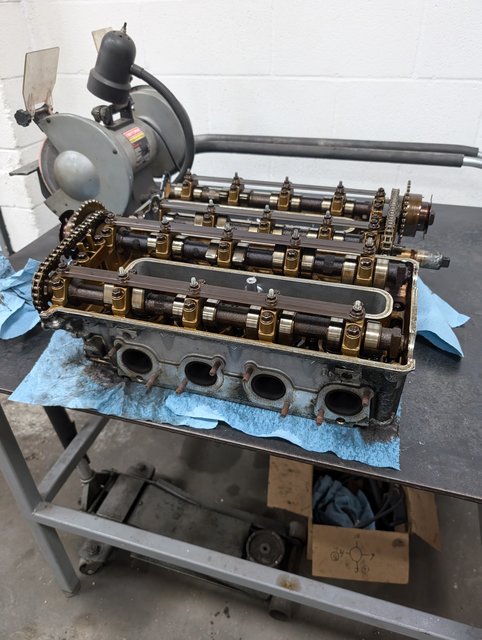 As an aside, the block still had a lot of antifreeze in it (green, I'm ashamed to say!), so at this point I pulled the plugs on the either side of the block and drained it all. Next up I inspected the head gaskets for signs of leaks, blowby, etc., and they looked good so I turned the motor over and looked in each cylinder. Happily they all looked great, to my untrained eye. As I said, I've seen pics of alusil motors with bore scoring, especially the M62 woes in this respect, but they look good to me. Below is an example of what each cylinder looks like. I've circled the discoloration (slightly blue, maybe?) that is in each one, often on opposite sides of the cylinder, but where I can not detect any variance in feel with my finger or fingernail. All the pistons, and combustion chambers look like this one....lots of carbon build up. 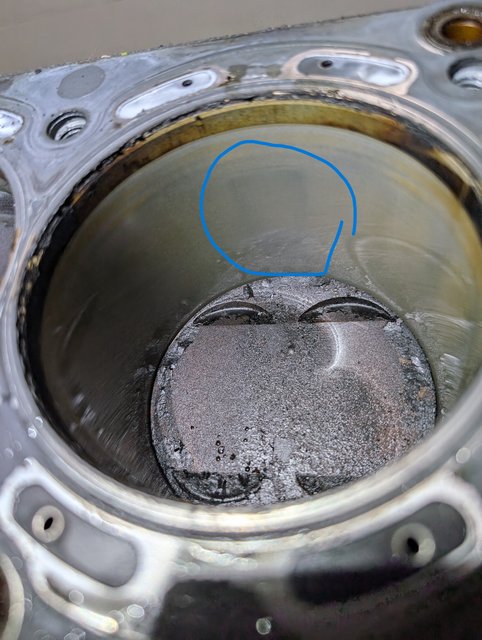 So I'm going to call this a win and plan on rebuilding this motor to put into something fun eventually. I'm still noodling just what sort of rebuild to do (M60B44, or just stock), so more to follow on that. Frankly, I've not had too much luck finding M60 heads that aren't cracked, etc. either so maybe I'll just rebuild a stock M62TUB44. This project will be a slow burn, so I'll likely just tack it onto my X5 overland thread, if anyone is interested at all. Next up is to buy a vanos socket so I can pull those solenoids and a crank hub tool to hold the thing so I can try to get that monster bolt off.
__________________
Current Original owner 2002 E53 X5 4.4i to 4.6i swap 2025 G06 X5 50e Former 1972 Audi Fox 1986 Saab 900S 1996 BMW Z3 1998 BMW E36 M3 Sedan 2004 BMW E46 M3 2006 Audi A3 Quatro 1993 Mopar 318 Jeep Grand Cherokee 2015 V6 Jeep Grand Cherokee Last edited by Henn28; 09-02-2024 at 07:21 PM.
|
|
#269
09-07-2024, 02:27 PM
|
|||
|
|||
|
Quote:
So, thank you again for all your wheel/tire examples!! I just bought new 265/60R18 Nokain Outpost APTs too. LARGE diameter 30.5" but I should only have wheel rubbage at extreme wheel turns.
__________________
I swear, my cars are like a girlfriend. Sometimes its a rough ride, sometimes its smooth motorin'. Sometimes she doesnt like how i treat her and sometimes i dont like how she behaves. BUT at the end of the day, she loves it when I am inside her. _______________________ '91 850i '05 X5 4.4i '09 Clubman S Last edited by Clockwork; 10-01-2024 at 02:52 PM.
|
|
#270
10-13-2024, 10:28 AM
|
||||
|
||||
|
Progress on the 4.4 rebuild is moving along…slowly. I decided to rebuild the 4.4, but with 4.6 cams. In theory this is a plug and play swap in the heads. The only difference between the two heads being the cams and springs. I sourced a set of cams from BimmerBreaker, and am looking for spring alternatives.
The cams are in nice shape with only minor wear marks on a few lobes and journals. A local machine shop is giving them a polish. 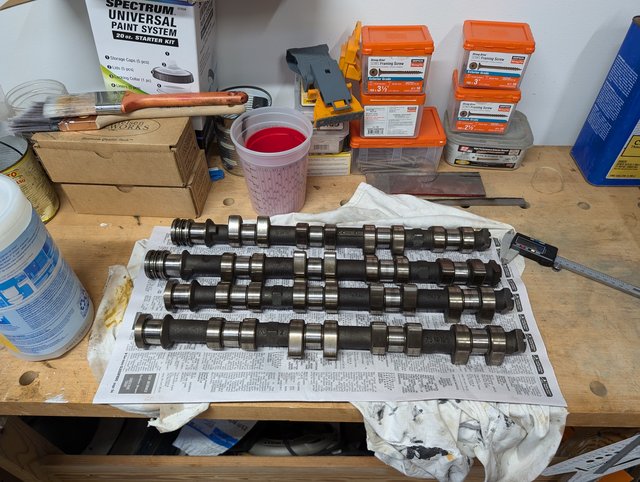 BMW still sells new 4.6 springs, somewhat surprisingly. But unsurprisingly they are expensive when multiplied by 32. I did buy one so I could compare it to any cheaper options that I might find. Basically from what I’m learning, the dimensions need to work in the heads obviously, and the rate needs to be somewhat greater to accommodate the 1.5mm higher lift and ramp of the 4.6 cams. The 4.6 spring I bought is below…looks the same, but isn’t. 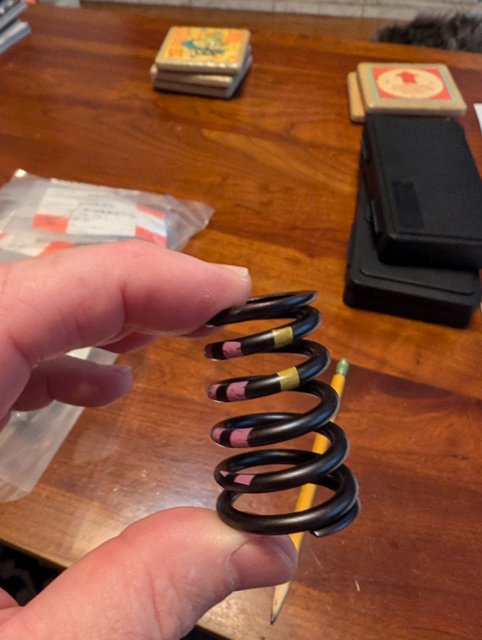 I’ve ordered an s62 spring to compare, as the s62 cams have just slightly less lift than the 4.6 cams from what I can tell. They are also much cheaper. More to follow on this, but I need to find a solution soon to keep this project moving along. I could use the 4.4 springs and just say clear of the read line, or I could “spring” for new 4.6 springs if the s62 springs are dimensionally different. The goal of this build is 310 hp though, so it will need to rev. Along with the spring search, I will need to have the valve reliefs on the piston tops milled another 1.5ish mm. Particularly on the intake side to keep them from kissing the pistons. JimLev from BimmerForums did some great work several/many years ago measuring the different lift and clearance between the 4.6 and 4.4 cams, with a 4.4 bottom end. Exhaust valve clearance turned out to be good, even with the bigger cams, but intake clearance dropped to less than .5 mm, not nearly enough. My plan is to have my local machine shop mill the intake relief pockets 1.5mm, and maybe do the exhaust side 1mm, to be extra safe. The same shop is going to do a full valve job and skim the head surface to ensure it’s flat. New valve seals, springs, keepers, etc. will go in and I’m planning on using VW tappers/buckets which are identical dimensionally, but weigh almost 7 grams less each. This should give a little more reliability at higher rpm. Side by side: 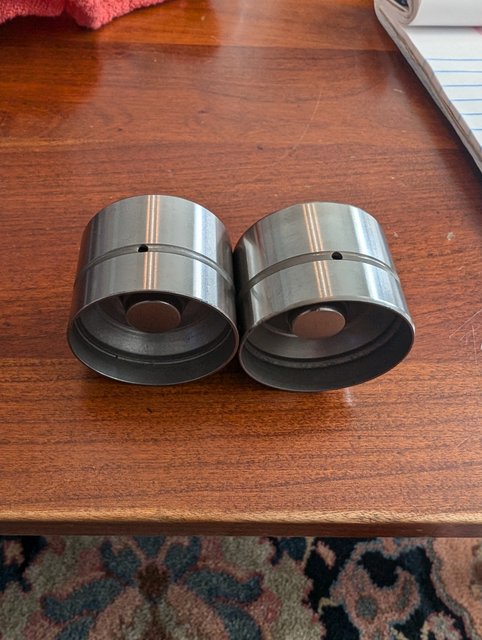 VW tapped on the scale: 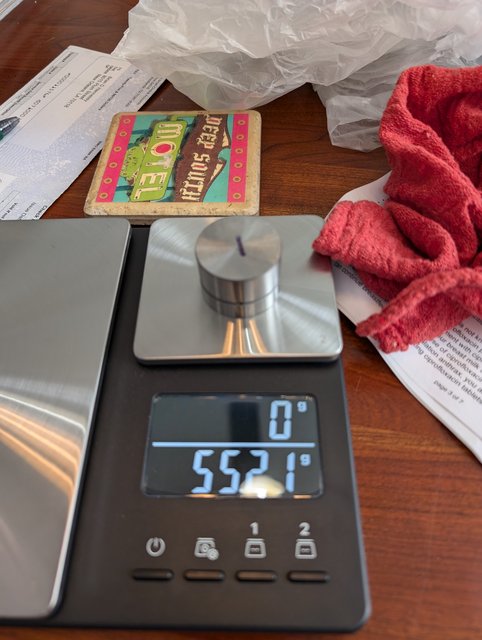 Springs aside, the vanos/cam bolts are busting my hump trying to get them out. They are only torqued to 90ish ftlbs (left had threads) but I’ve failed with a big breaker and then bought a new impact and gotten one out before I broke my t55 bit. Heat hasn’t helped at all on the other 3. I ordered a t55 impact torx and will go at it again with a bigger breaker. 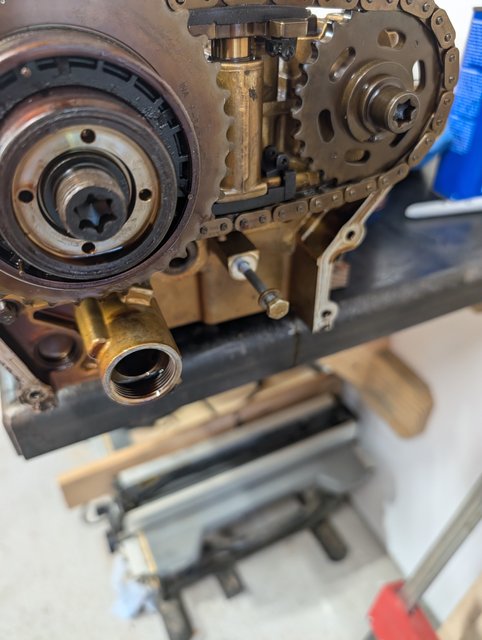 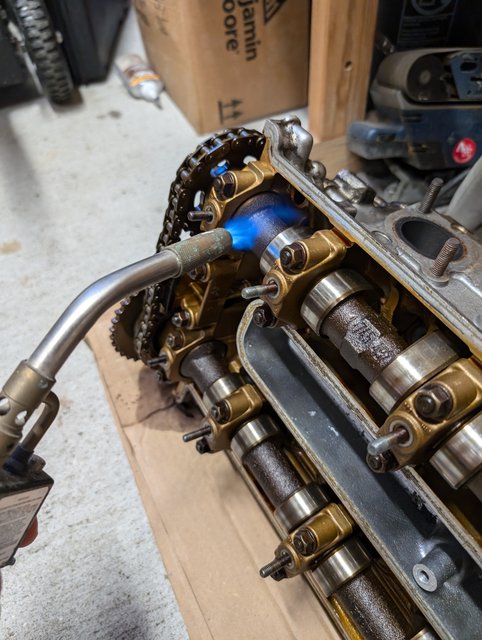 Fortunately the one bolt that came free was an intake bolt so I was able to get the vanos unit off. All I really need is the other vanos cam bolt off so I can remove that vanos for rebuild. The exhaust cams can come out with the sprockets on and get tossed if I run out of patience. The sprockets and bolts are cheap. Once the cams are off and the vanos units get sent to JimLev for a rebuild, I’ll take the heads to the machine shop so they can pull the valve train and get milling. I would expect they will find that the heads need some guides and maybe a valve or two as their work progresses. As far as the bottom end goes, it’s still sitting in the shop I use with the lower cover and oil pan on. Once I get the heads off to the machine shop I’ll turn my attention to getting the Jesus bolt off and the block broken down.
__________________
Current Original owner 2002 E53 X5 4.4i to 4.6i swap 2025 G06 X5 50e Former 1972 Audi Fox 1986 Saab 900S 1996 BMW Z3 1998 BMW E36 M3 Sedan 2004 BMW E46 M3 2006 Audi A3 Quatro 1993 Mopar 318 Jeep Grand Cherokee 2015 V6 Jeep Grand Cherokee Last edited by Henn28; 10-13-2024 at 10:35 AM.
|
|
| Bookmarks |
|
|
|
|


 Linear Mode


