
|
|
|
|
||||||||||
| Xoutpost server transfer and maintenance is occurring.... |
| Xoutpost is currently undergoing a planned server migration.... stay tuned for new developments.... sincerely, the management |
 |
|
|
LinkBack | Thread Tools | Display Modes |
|
#341
 05-15-2014, 08:22 PM
|
|||
|
|||
|
Quote:
And then there's that pesky from axle bearing stuck on the axle. I suppose I better dealing with that sooner rather than later so see what I'll end up having to do to get it working again. But I'm a glass is half full kinda a guy, so I'm still optimistic I'll have the 4.6 back on the road by early June!
__________________
2018 Honda Accord Touring 2.0t - 44k 2015 Honda CR-V EX-L - 82k 2002 X5 4.6is - 133K 2002 Chevy 3500 4x4 LT CC LB - 110k 1998 Subaru Legacy GT 5 speed - 144k 2002 4 Runner Limited - Sold 2006 E60 M5 - Sold 2000 Corvette - Sold 1994 Infinity Q45t - Sold 1982 F150 4x4 - Sold 
|
| Sponsored Links | |
|
|
|
|
#342
05-16-2014, 09:48 AM
|
|||
|
|||
|
JagRepair.com - Jaguar Repair Information Resource
that link pretty much has all the information you will need to get that ZF back to factory spec 
__________________
2006 X5 48is Black / Black - LED AEs - FCAB - GAS 1.2bar cap
|
|
#343
05-16-2014, 12:36 PM
|
||||
|
||||
|
Before all the electronics we tested engines before we dropped them in. Is there a version of that now?
__________________
 X5 4.6 2002 Black Sap, Black interior. 2013 X5M Melbourne Red, Bamboo interior X5 4.6 2002 Black Sap, Black interior. 2013 X5M Melbourne Red, Bamboo interiorDallas
|
|
#344
05-16-2014, 06:48 PM
|
|||
|
|||
|
Very cool link bigblac! I have come across some of the links from that page, but it is great to have a "'launch page" if you will and there are some awesome links!
This evening I pretty much just to got intake pieces and brackets cleaned. They were extremely oily all of them. Belt tensioners/pulleys/brackets  Shot of the rear intake cover to capture where the brackets go  Intake pieces all cleaned up. Took like 30 mins to get the TB throat cleaned up. Boy that brown film of grime was hard to get off, even with brake cleaner.  Also got the front axle bearing soaking in pb blaster. I plan to use a large open wrench on top of the bearing and then give it a go with the sledge 
__________________
2018 Honda Accord Touring 2.0t - 44k 2015 Honda CR-V EX-L - 82k 2002 X5 4.6is - 133K 2002 Chevy 3500 4x4 LT CC LB - 110k 1998 Subaru Legacy GT 5 speed - 144k 2002 4 Runner Limited - Sold 2006 E60 M5 - Sold 2000 Corvette - Sold 1994 Infinity Q45t - Sold 1982 F150 4x4 - Sold Last edited by stunt; 05-16-2014 at 08:56 PM.
|
|
#345
05-16-2014, 09:38 PM
|
||||
|
||||
|
There has to be an interference fit between the bearing and the housing or else the bearing will be spinning inside the housing. Could be that when they assemble the bearing and housing, the bearing was cooled and the housing heated so that the bearing would shrink and the housing will expand and you could just slip the bearing into the housing.
__________________
2006 Infiniti G35 2001 BMW 3.0I E53 X5 Build date 08/2000 SOLD Lotus Europa 1970 Destroyed by fire Lotus Europa 1970 S2 Renault Powered Lotus Type 52 1970 Twincam Webers Powered PORSCHE 911 Targa 1982 The Garage Queen Audi Avant donated to Kars for Kids BMW 525IT Sold Audi 4000CS Quattro Sold Jensen Healey Lotus Powered Sold Opel 1900 Sold Triumph Spitfire 1971 Sold Triumph Spitfire 1968 Sold Plymouth "Cuda" 340 Six pack SOLD
|
|
#346
05-17-2014, 04:09 PM
|
|||
|
|||
|
I got the bearing situation resolved I believe, but let me back up and wrap up the engine first.
Intake gaskets installed  Torque the 10 nuts to 15 Nm  Installed new hose on rear manifold cover. The original one had a zip tie on it, so I figured I'd do the same  Route that house under the coolant pipes when installing  Make sure the long pipe fits into the hole in the front end of the manifold  Torque torx bolts to 8 Nm  Fitting new hoses to match the old  Installed  Front cover and TB installed along with accessory bracket and dip stick  New crank bolt installed  New crank pulley bolts torqued to 22 Nm  Vacuum hoses routed  Rear view  Front view  That's pretty much it for the engine for now! Circling back to the front axle bearing. I was able to remove it from the axle using my shop press and a couple of pieces of iron that would fit between the bearing and CV housing  Bearing all cleaned up. Still nice and tight  Axle shaft  I re-packed the bearing and installed it into the housing using a 1 7/8" socket and sledge  New axle seal installed  And axle shaft installed. Used a block of 4x4 and a sledge.  So now it's finally time to tear down the transmission! First I removed the gear position sensor. I need to get some wireloom to replace that old cracked up one on there now.  New I flipped the tranny over. It was a little on the heavy side, but I managed  Pan removed  Inside of pan doesn't look too bad. This is before I touched it with anything. So it is still pretty much as clean as it was when I last had it off some 1000 miles ago or something like that.  Valve body  Electrical connector pushed into housing after removing retaining clip  Input and output shaft speed sensors pulled  After loosening all the large head T27 bolts, the whole assembly lifts right off  Main housing at this point  I next used a punch to drive the pin out of the selector shaft  I then used a 1/4" extension and cardboard to pry the oil lines loose.  Here they are along with the selector shaft  Next I removed the circlips from the 2 pressure springs  I was unable to pull the sealing sleeves out from the base of the bores using a pick took. They are in there real good. I can rotate them, just not pull them out. May need to fashion a better tool for this purpose. That's it for now.
__________________
2018 Honda Accord Touring 2.0t - 44k 2015 Honda CR-V EX-L - 82k 2002 X5 4.6is - 133K 2002 Chevy 3500 4x4 LT CC LB - 110k 1998 Subaru Legacy GT 5 speed - 144k 2002 4 Runner Limited - Sold 2006 E60 M5 - Sold 2000 Corvette - Sold 1994 Infinity Q45t - Sold 1982 F150 4x4 - Sold Last edited by stunt; 05-18-2014 at 07:03 AM.
|
|
#347
05-17-2014, 05:28 PM
|
|||
|
|||
|
Too late, I know, but Id strongly advise against levering against the valve block sealing face to remove the pipes. Its better to feed a piece of cloth under the pipe, wrap the ends together and then pull.
This is the tool I made up to remove the C & D clutch rubber jump tubes : 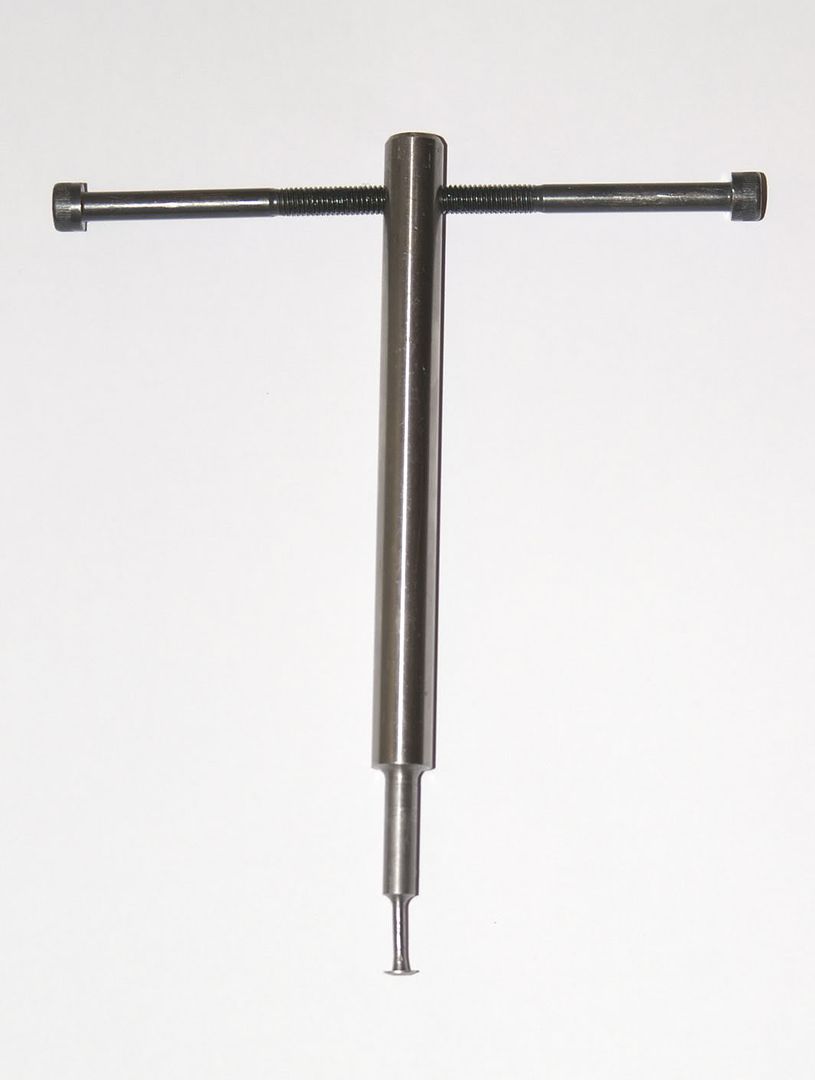 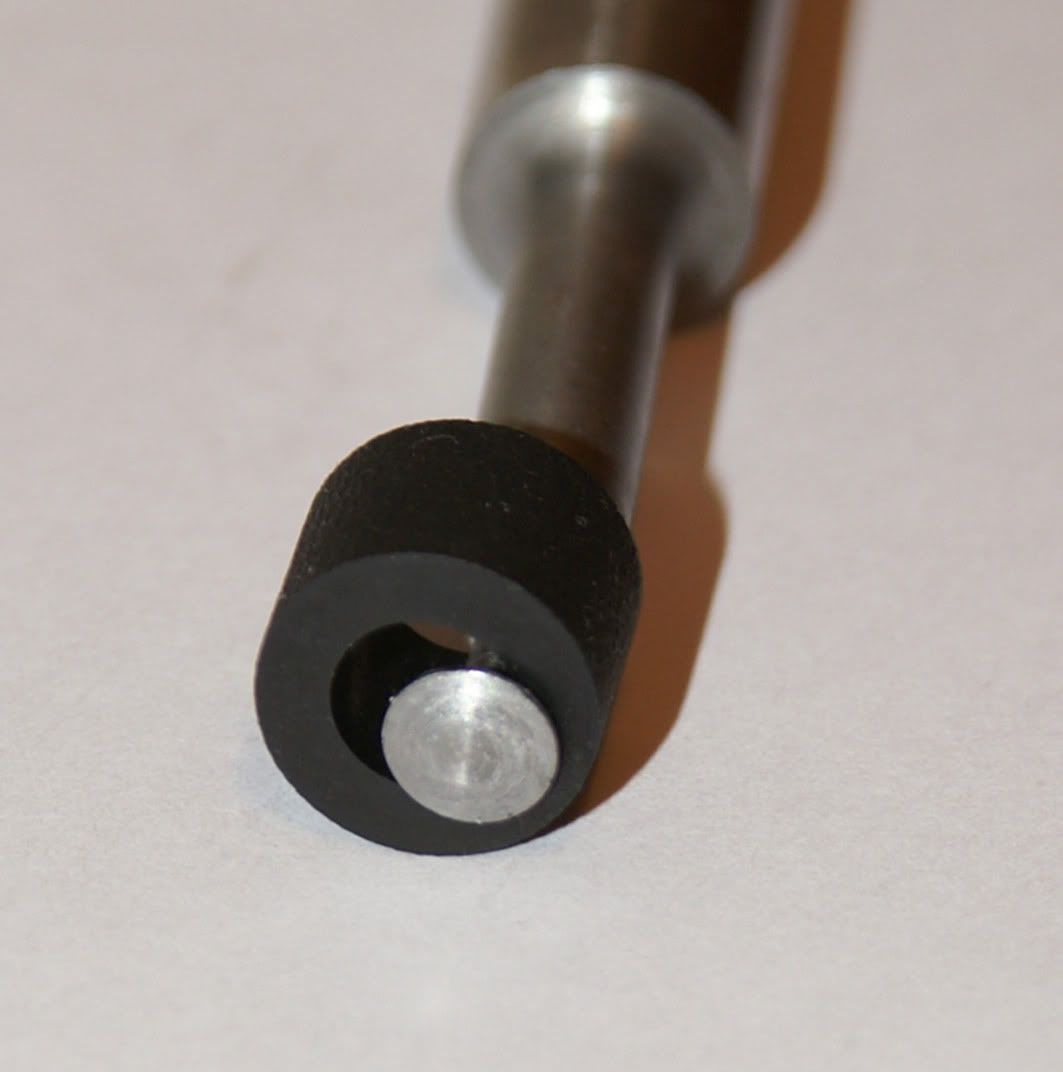 Youll have noticed that the two circlips for the anti-gravity springs dont sit in grooves and just rely on friction with the bore to keep them in place. When you replace them they need to sit at a depth of around 4mm into the hole.  Phil
|
|
#348
05-17-2014, 07:58 PM
|
|||
|
|||
|
Quote:
I did notice those circlips holding the springs in place were not in a groove. Was kinda odd. Appreciate the tip on the 4mm spacing for when I put them back together again! I did manage to get those grommets out with a little more patience and dedication using my pick tool! Here they are along with a few other pieces I removed. In hindsight (reading further ahead in the 5HP24 repair manual), I probably would have been better of not removing the detent spring seen in the picture below as it will now need to be re-aligned during re-assembly, which looks to be a bit of a pain from reading section 1.4.9 of the manual, possibly requiring 2 special tools.   With the grommets removed, I stood the transmission on its end with the transfer case bolts resting on some 6x6 blocks that allow the output shaft to drop between them. I then removed the bolts holding the bell housing the the main housing. There are 6 bolts that you don't want to undo yet as they hold the intermediate plate in place.  So here's the bell housing/intermediate plate along with tower II which contains clutches A and B I believe.  So here's looking down at tower I which is removed next. Before removing it, there's a snap ring that comes off pretty easy with needle nose pliers and a screwdriver  There's still more stuff down there. Some planetary gears and such.   So after the planetary gears are removed, the parking lock gear is revealed.  Next the transmission is flipped over and the output assembly is removed from the housing. This reveals 12 counter sunk bolts which can now be removed.  Unfortunately I managed to strip the last one (figures), so I'll need to drill it out before the housing will be completely void of guts.  So here's everything that was removed laid out in the order it was removed from right to left. There are 4 roller bearings visible which I have labeled 1 - 4.  Close up of bearing 1.  Close up of bearing 2. Rollers looks pretty shot.  Close up of bearing 3.  Close up of bearing 4.  Next up is cleaning the shop floor. Taking the transmission apart made a terrible mess. I should have planned better and anticipated all that spilled oil as I was taken the housing apart.
__________________
2018 Honda Accord Touring 2.0t - 44k 2015 Honda CR-V EX-L - 82k 2002 X5 4.6is - 133K 2002 Chevy 3500 4x4 LT CC LB - 110k 1998 Subaru Legacy GT 5 speed - 144k 2002 4 Runner Limited - Sold 2006 E60 M5 - Sold 2000 Corvette - Sold 1994 Infinity Q45t - Sold 1982 F150 4x4 - Sold Last edited by stunt; 05-18-2014 at 07:24 AM.
|
|
#350
05-17-2014, 11:00 PM
|
||||
|
||||
|
Quote:
 Why did you take the transmission apart? Was there a problem with it? Obviously, with the way bearing #2 looked, it wasn't a bad thing. BTW: for drilling out bolts, there's nothing like left handed drill bits and a good extractor set. I have a Mac Tools set (P/N: MEX35) Scored it off ebay. I also succombed to your Snappy torque wrench porn and bought an atech2fr100a 1/4 torque wrench w/angle torque capability. I don't think my wife is going to let me view this thread anymore...
__________________
Kirk Las Vegas 2016 X5 40e Mineral White/Black Dakota Leather, ZLL, ZCW, ZDA, ZDB, ZPP, multi contour seats, rear side window shades, HK stereo 2011 E90M3, 6-speed manual
|
|
| Bookmarks |
| Thread Tools | |
| Display Modes | |
|
|
|
|


 Linear Mode


