
|
|
|
|
||||||||||
| Xoutpost server transfer and maintenance is occurring.... |
| Xoutpost is currently undergoing a planned server migration.... stay tuned for new developments.... sincerely, the management |
 |
|
|
LinkBack | Thread Tools | Display Modes |
|
|
|
#1
 01-07-2015, 07:25 PM
|
|||
|
|||
|
MEASURING EFFECTIVENESS
For a period of time, I actually drove around with a valve on the oil drain that I would regularly drain to collect the filtered oil [there's nothing coming out of that valve, it's just some odd light effect...]. I had it tucked it away behind one of the plastic covers. 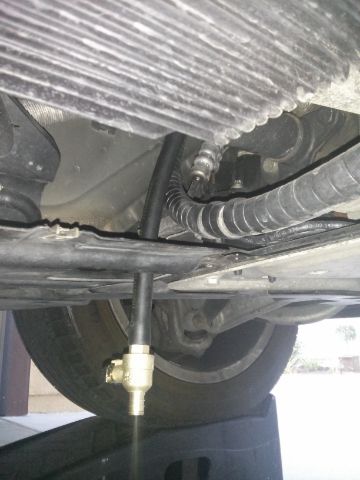 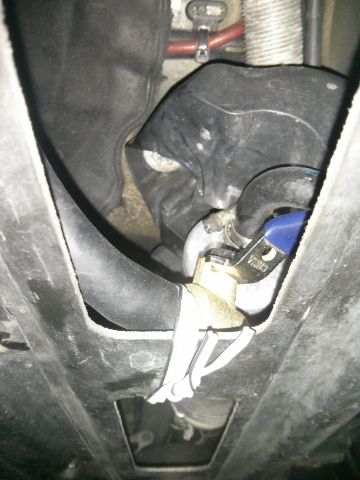 I knew the system was working remarkably well when after 1,864 miles I collected this much oil. 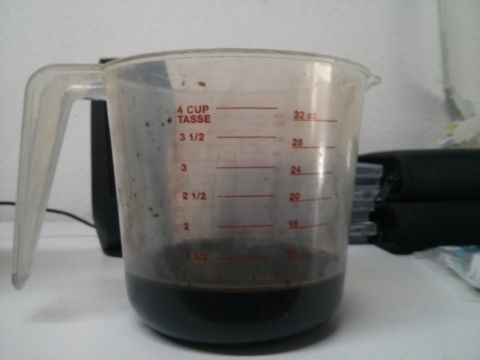 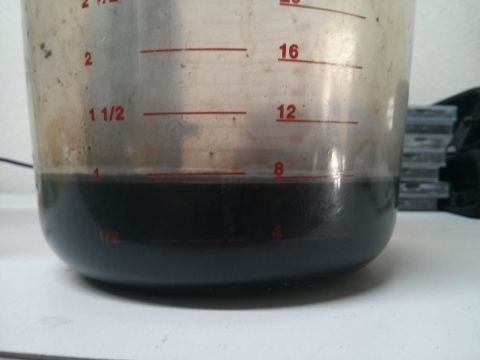 MODIFY THE DIPSTICK TUBE TO ADD A RETURN LINE This made the system maintenance free and allowed the oil to drain back to the sump. I was able to find be the perfect tee to make a saddle on the oil dipstick guide to drain the oil: Shop Apollo 1-in x 1-in x 1/2-in Barb Fitting at Lowes.com 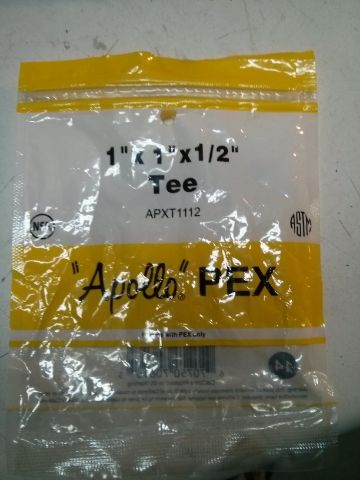 The tee is 1" x 1" x 1/2" Using a jig saw I cut lenghtwise the 1" section; with some epoxy and some clamps to add strenght I attached it to the dipstick guide and once the epoxy cured I drilled through the 1/2" nipple to open the drain. Here's the final product: 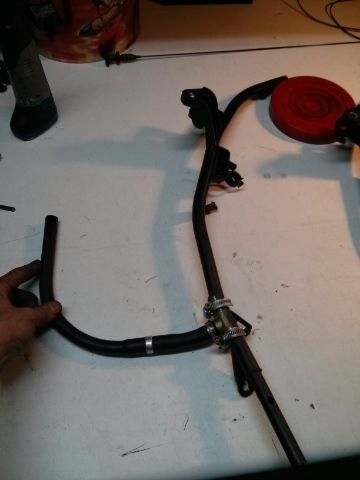 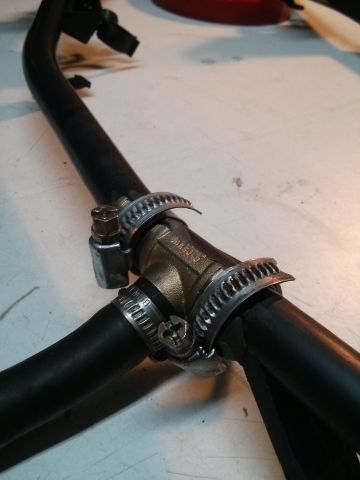 What you see there along the rubber drain is a check valve that allows oil to drain but doesn't allow fumes to travel up the drain. 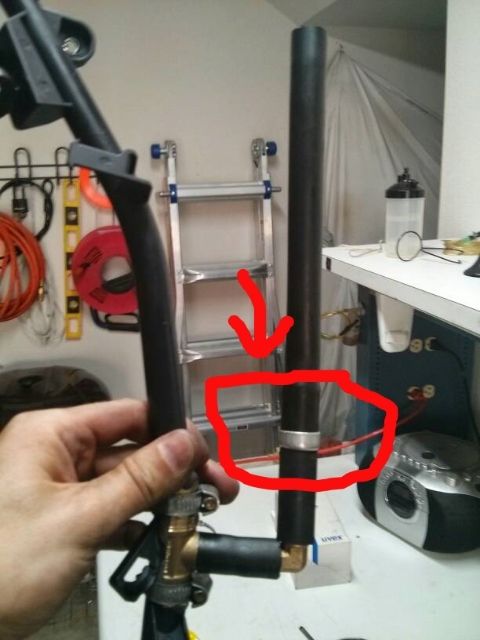 After noticing that the hose would tend to kink, I added a elbow for a better turn.
__________________

Last edited by ZetaTre; 01-07-2015 at 07:37 PM. 
|
|
#2
01-07-2015, 10:48 PM
|
||||
|
||||
|
Very nice write-up. This is something that I have wanted to do, Thank you for information. I'm going to work on a parts list.
__________________
8/2011 X5 xDrive35d Sport, Black Sapphire Metallic, Black Nevada Leather, Fine Burr Walnut Trim 2/2001 M5, Jet Black, Exclusive Complete Black Walk Nappa Point Heritage Leather, Black Cubic Trim
|
|
#3
01-09-2015, 02:19 PM
|
|||
|
|||
|
Quote:
You can get the p/n from the ProVent catalog here: https://www.mann-hummel.com/fileadmi...nt_en_2013.pdf
__________________
|
|
#4
03-10-2015, 03:04 PM
|
|||
|
|||
|
Quote:
And what do you mean with regard to drilling through the 1/2" nipple to open the drain? Does the tee come with the 1/2" nipple blocked off? I don't think I've seen a tee come with one of the tees blocked off from the manufacturer, but I suppose it could be. Or are you talking about running a drill bit through it to clean up any epoxy drips that might be plugging it up? Sorry for not quite understanding.
__________________
Stephen 2010 e70 35d- now driven by son #2 2005 e53 3.0 - now driven by son #1 2021 G05 45e PHEV - now driven by me 2008 ML320 CDI - driven by wife
|
|
#5
03-11-2015, 01:42 PM
|
|||
|
|||
|
Quote:
I did not cut the dipstick, just drilled it thorough once the saddle is installed and the epoxy has cured.
__________________
|
|
#6
03-11-2015, 04:59 PM
|
|||
|
|||
|
Now I understand. Thanks for the clarification.
Provent and other supplies ordered. Regards.
__________________
Stephen 2010 e70 35d- now driven by son #2 2005 e53 3.0 - now driven by son #1 2021 G05 45e PHEV - now driven by me 2008 ML320 CDI - driven by wife
|
|
#7
04-21-2015, 10:04 AM
|
|||
|
|||
|
Variation on the installation - how I did it
I recently finished doing a ProVent installation. As I will discuss, I made some variations to ZetaTre's approach, but really just minor modifications. Some of the modifications were about what parts I chose to use. Other modifications were done since I don't have a CNC metal working machine, and to avoid TIG welding of aluminum. Be aware that I am just a hobbyist, and some of the things I say may not be totally correct. I am glad to be corrected on any of these issues.
First of all, many thanks to ZetaTre for his work on this topic. Without his posts I never would have had the confidence to do this. The earlier posts in this thread are essential and give a great background to the issue. I chose to go down this road after finding moderate carbon build up on my swirl flaps and intake manifold (the link to that post is here). The parts I used are shown in this picture. ZetaTre already talked about where to get the ProVent and oil return check valve - no need to repeat. To make the takeoff plate, I bought 1/4 inch aluminum plate from Amazon (link is here). I burned through about 6 metal cutting jigsaw blades to shape the takeoff plate, but it wasn't too bad. Since I don't have any friends who know how to TIG weld aluminum, I made the elbow from a 90 degree hose end piece from Summit Racing (the link is here). This piece was combined with a bulkhead fitting from Summit (link is here), and a size -16 bulkhead nut from Amazon (link is here). I used a 1 5/16 metal cutting hole cutter from Amazon (link is here) and a drill press to cut the hole in the takeoff plate. Those parts assembled nicely to form a takeoff plate with elbow ready to accept the hose. One of more challenging things was finding a roughly 1 inch ID oil/vapor resistant hose to go to/from the CCV takeoff plate and the ProVent. Many people have used heater hose, but it soon seems to deteriorate. Some on the VW TDI forums have used rigid PVC pipe. I did a lot of searching, and eventually decided my best bet was 24 mm crankcase breather hose from Patrick Motorsports (link is here). Patrick Motorsports make a number of specialty items (many for Porsche), and this hose is used in several of their oil catch can kits. A bit pricy, but it works well. Flexible enough for installation, and fits all the connections without modification. Vacuum brake boost hose (ID 15/32 inch) was purchased online, and the 1/2 inch ID oil return hose was purchased AutoZone. One silly little detail was the need for 10 x 16 mm washers (link to Amazon is here). Since the 1/4 inch aluminum plate is not as thick as the original hard plastic CCV cap, washers are needed if the original bolts are going to be used. I could have purchased shorter bolts, but it seemed easier to use washers instead. First, here is an overview picture of the completed installation. One can see the CCV takeoff plate and hoses on the left (green arrow), they curl around the back of the engine and connect to the ProVent on the right (blue arrow). The yellow arrow shows the engine partition compartment that cracked (to be discussed later), and the red arrow shows where the butyl tape was used (also discussed later): Here is a detail pic of the installed takeoff plate on the CCV side: And here is a detail picture of the installation at the ProVent side. The bracket that holds the ProVent will be discussed a bit later. Also, note the brake vacuum boost hose that is routed over/next to the ProVent (red arrow) - that will also be discussed later: As discussed by ZetaTre, a bracket needs to be manufactured to hold the ProVent (this replaces the bracket that held the vacuum brake line). He has a pic of his, but mine is slightly different. I bought some 1/4 inch aluminum plate at Home Depot and cut it as shown, then bent it in a vice to allow the proper angle. Here is a pic: A few other details: As described by ZetaTre, the vacuum brake boost hose needs to be re-routed. ZetaTre chose to do this at a spot that is up under the intake manifold and is (for me, at least) quite hard to get to. I found I was able to replace the roughly 3 inch segment of hose with a roughly 8 inch segment, and everything fits nicely. If one wants to do it this way (which I think is much easier) then this connection has to be the last hose connection made. In other words, remove the roughly 3 inch segment of original vacuum boost hose, install the ProVent, then replace with a roughly 8 inch segment of new vacuum boost hose. One of the pictures above shows the new hose in position. There is still enough room to remove the ProVent cap and filter element. Of course, make sure one uses vacuum brake boost hose (not heater hose) that won't collapse under vacuum. ZetaTre talks about how the CCV bolts are an unusual pentagon shape. He utilized "the almighty Dremel" to shape a hex wrench to fit. It turns out that a set of "security star bits" will fit the bolt quite nicely. Be aware that you want a "star bit" with 5 points, rather than a torx bit, which has 6. Here is a picture of a security star bit that fit perfectly: ZetaTre chose to remove the soundproofing material from the engine. I preferred to leave mine on. But if you do, the new hoses make it impossible to get the black plastic cap back into position without modification. It was an easy task to get out the jigsaw and cut off portions of the back and sides so it fit just fine. Here is a picture after the modification: Last issue, while doing this work I had to remove the engine compartment partitions to gain better access to the rear of the engine. These parts are known to crack, with resultant water leakage and injector failure. This link gives a good description of the issue, with lpcapital (aka ZetaTre) once again elegantly diagnosing and solving the problem. I had checked these partitions about a year ago and they were fine then, but no longer. Here is a pic of the cracked center partition: Rather than spend money on a new partition, I used a bunch of epoxy to repair the joint, and re-assembled the partitions using butyl tape as discussed in the SIB referred to in the link above. I've had this operational for a few weeks and all is fine. No engine codes or change in performance. In a few months, I'll thread a borescope through the throttle valve to inspect the EGR valve to hopefully confirm no carbon build up on the EGR valve. Otherwise, thanks again to ZetaTre.
__________________
Stephen 2010 e70 35d- now driven by son #2 2005 e53 3.0 - now driven by son #1 2021 G05 45e PHEV - now driven by me 2008 ML320 CDI - driven by wife Last edited by sgrice; 04-21-2015 at 04:33 PM.
|
|
#8
01-09-2015, 08:49 PM
|
||||
|
||||
|
Quote:
__________________
8/2011 X5 xDrive35d Sport, Black Sapphire Metallic, Black Nevada Leather, Fine Burr Walnut Trim 2/2001 M5, Jet Black, Exclusive Complete Black Walk Nappa Point Heritage Leather, Black Cubic Trim
|
|
#9
01-26-2015, 02:04 PM
|
|||
|
|||
|
THE FINAL TAKEOFF PLATE
Like I said in the prior post, I had someone scan the profile, replicate it in CAD and machine it out for a perfect result. I then bought a 1" aluminum elbow mandrel bent. The elbow is made by HPS: HPS 1" 90 Degree Bend 6061 Aluminum Tubing 16 Gauge w/ 6" Leg & 1.5" CLR I bought mine from Amazon since I have free shipping with Prime: Amazon.com: HPS (AT90-100-CLR-15) 1" 16-Gauge 90° Bend 6061-T6 Aluminum Elbow Tubing: Automotive 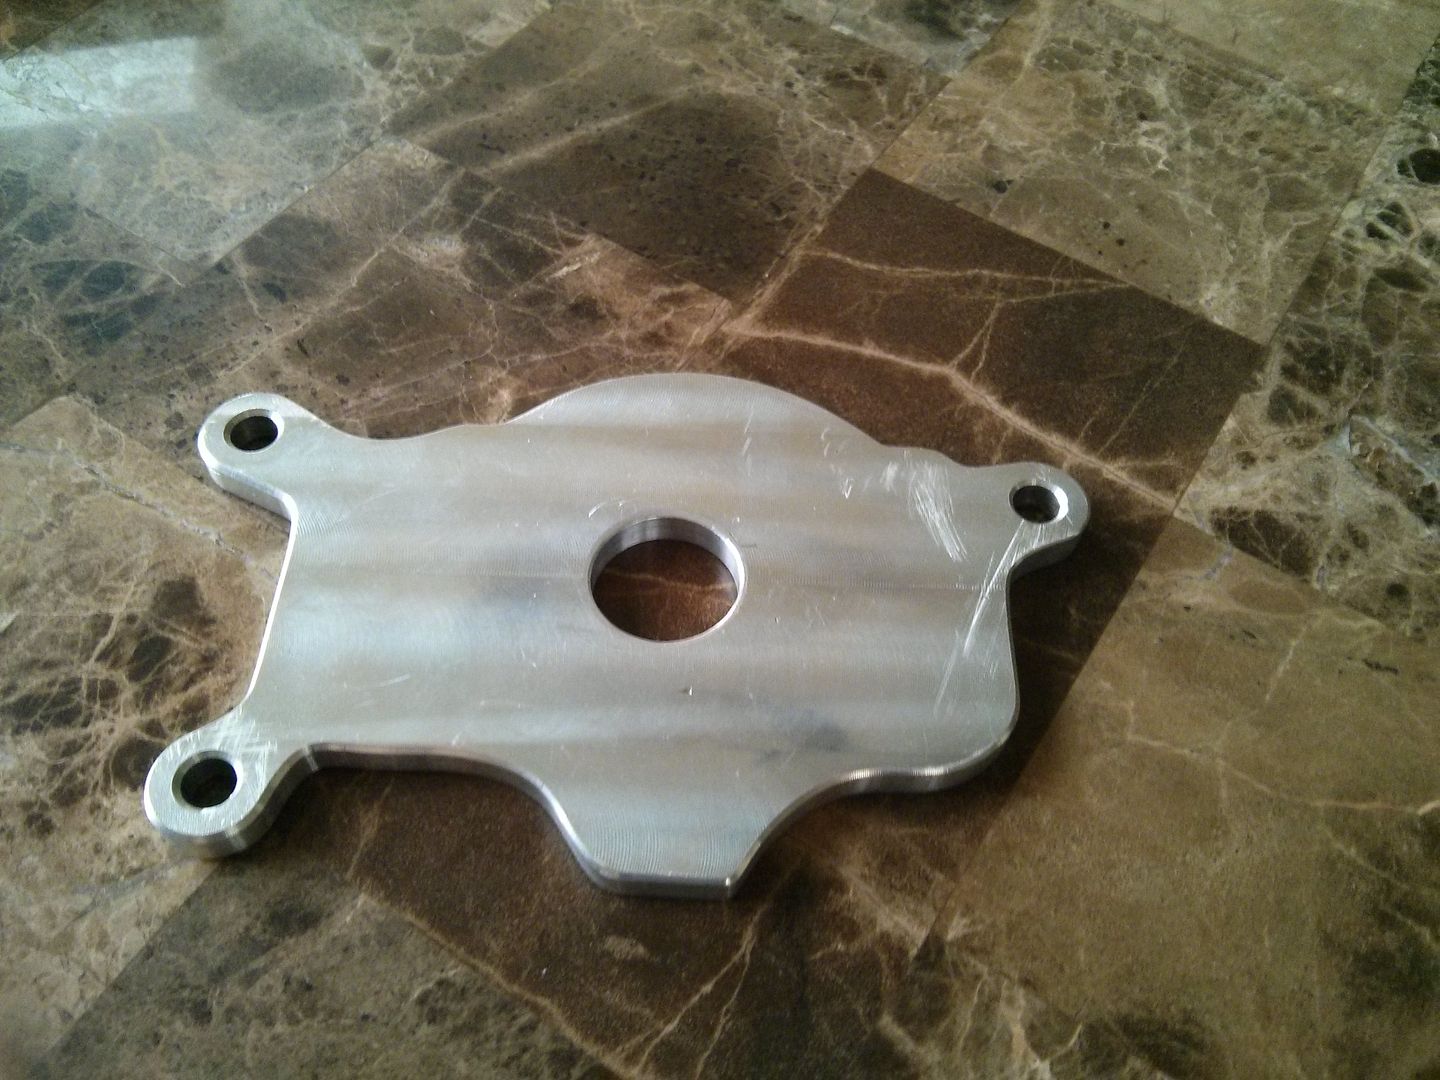 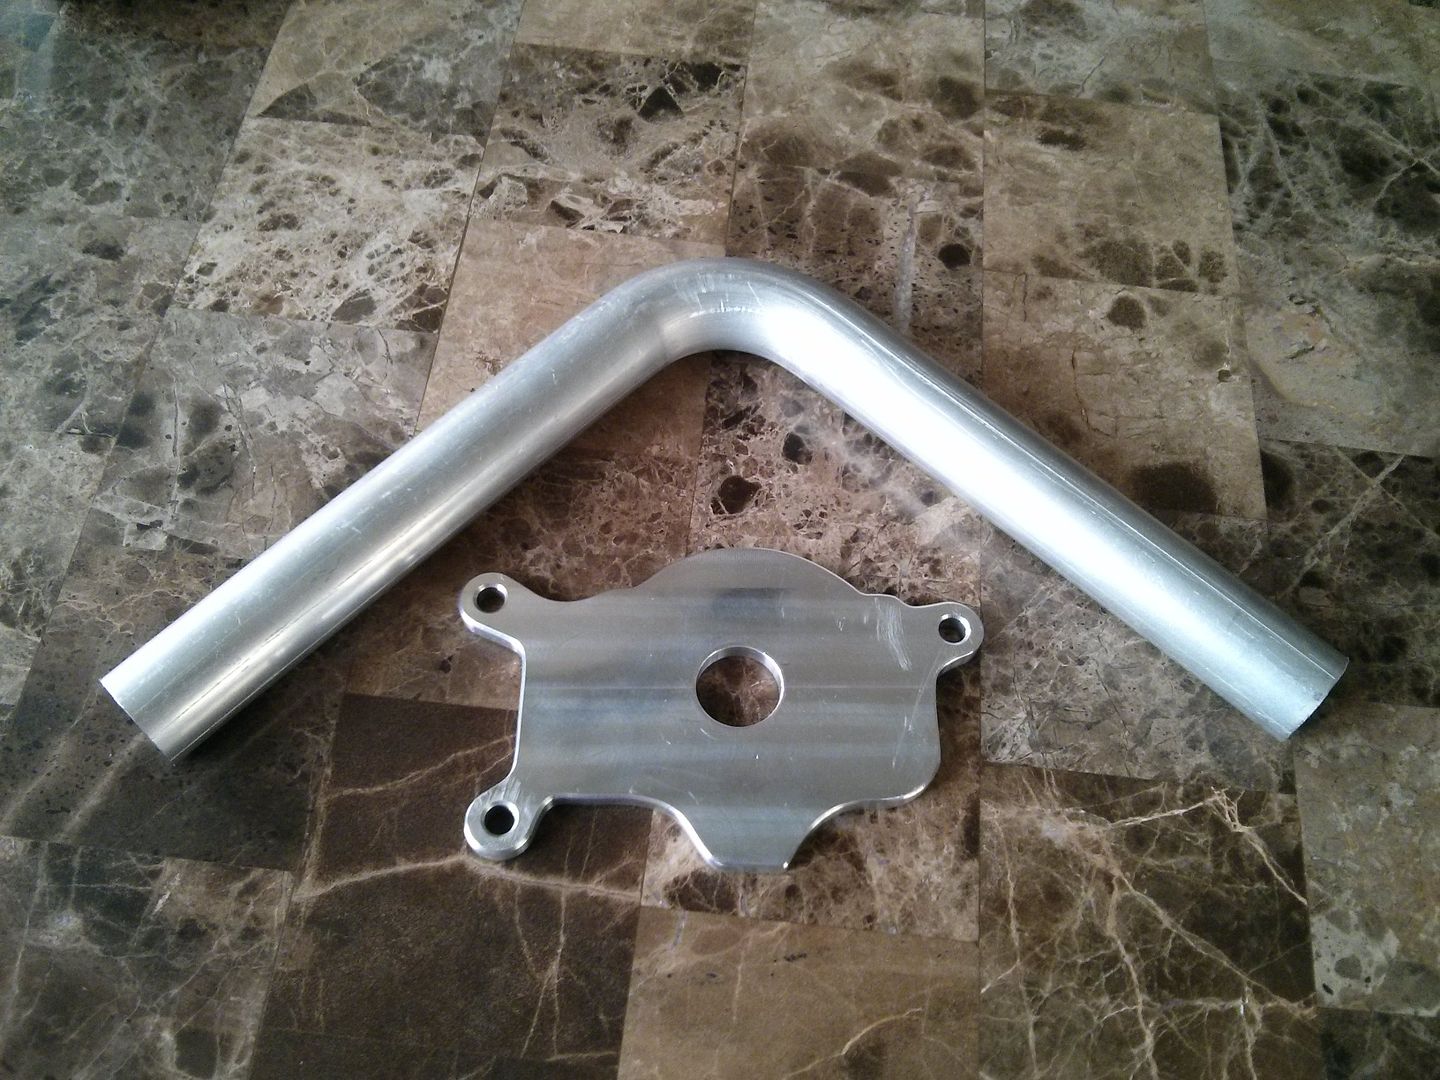 This Saturday I went to a local fabricator I've been using for all sorts of projects and had the elbow TIG welded to the plate.  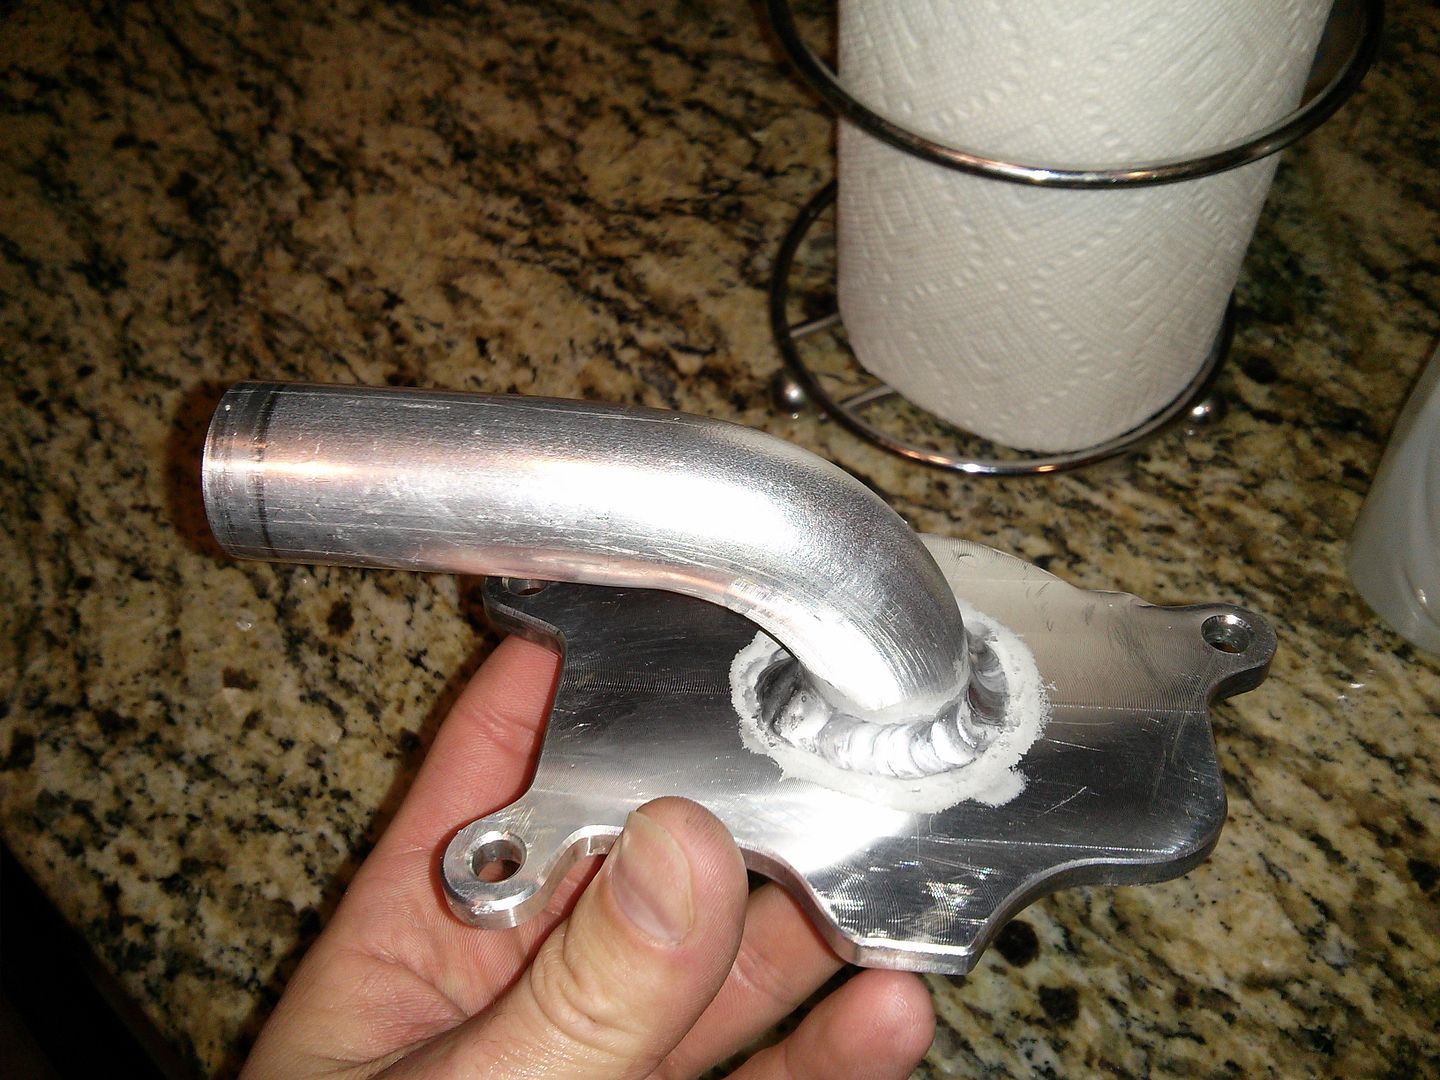 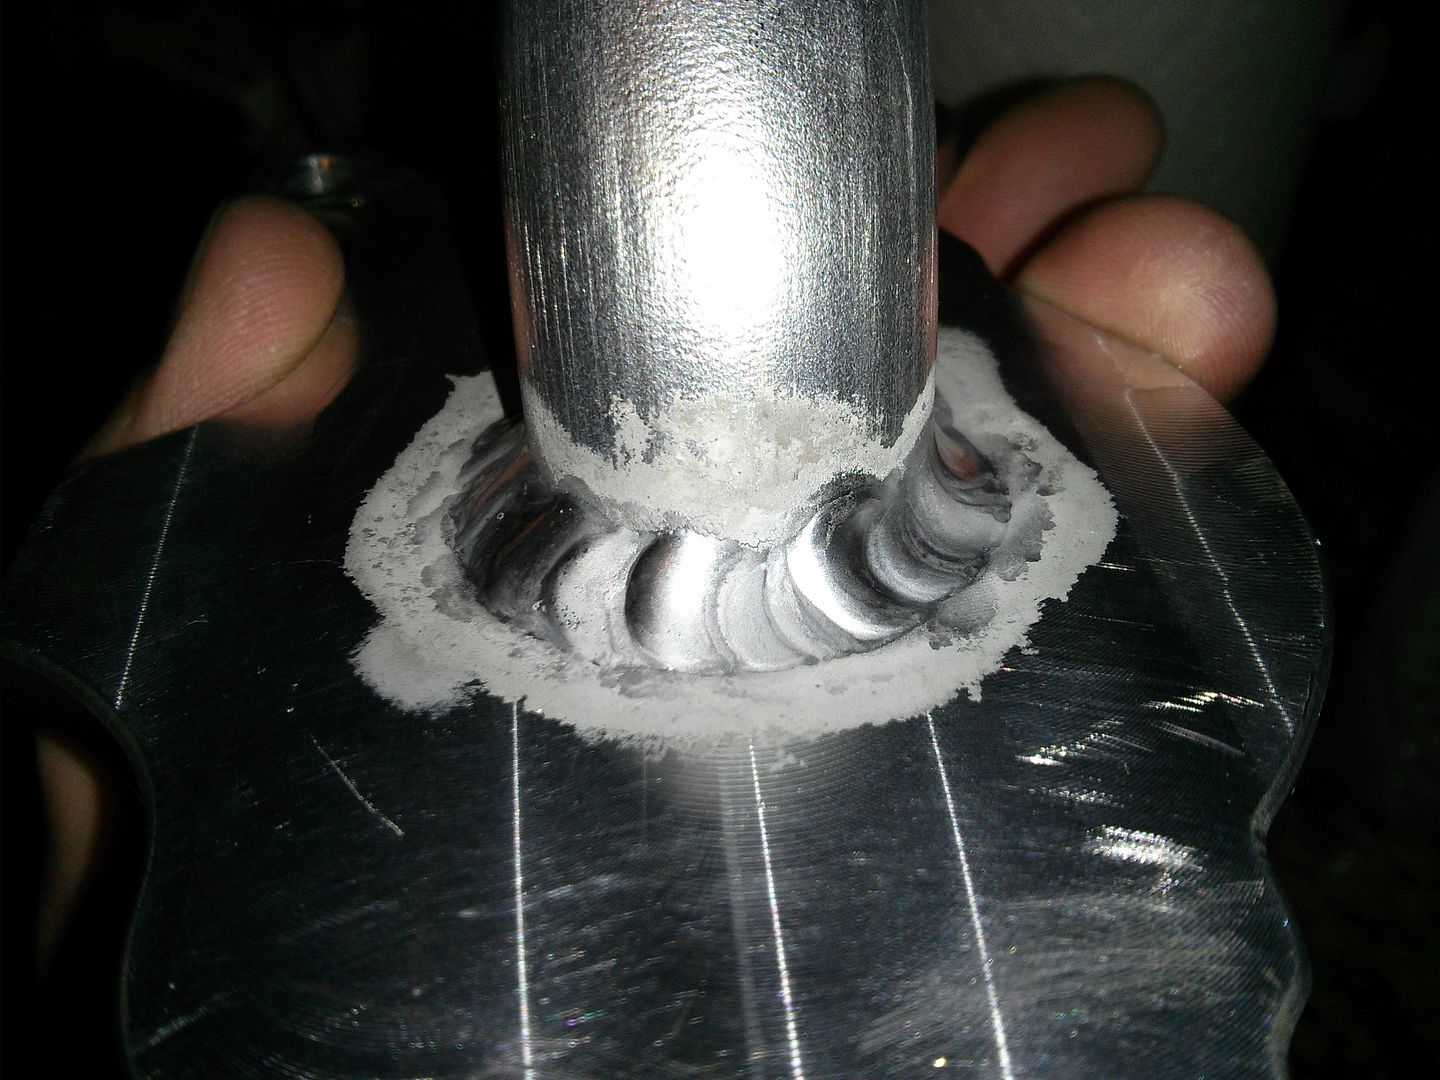 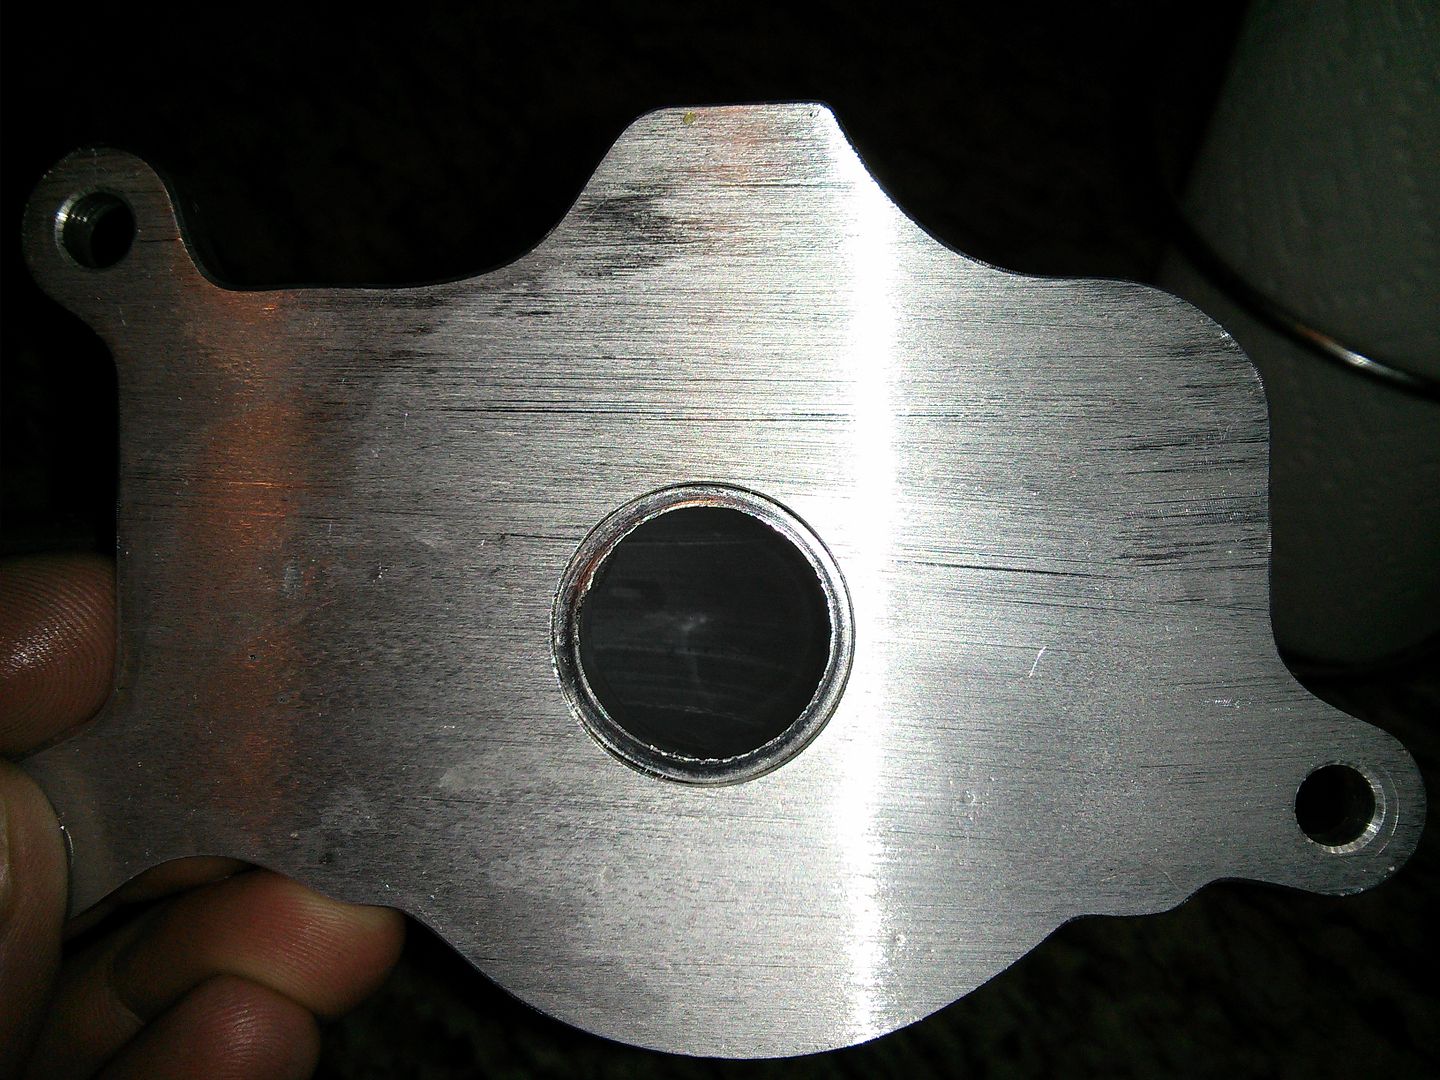 Used a rattle can of Rustoleum High Heat flat black for a clean finish. 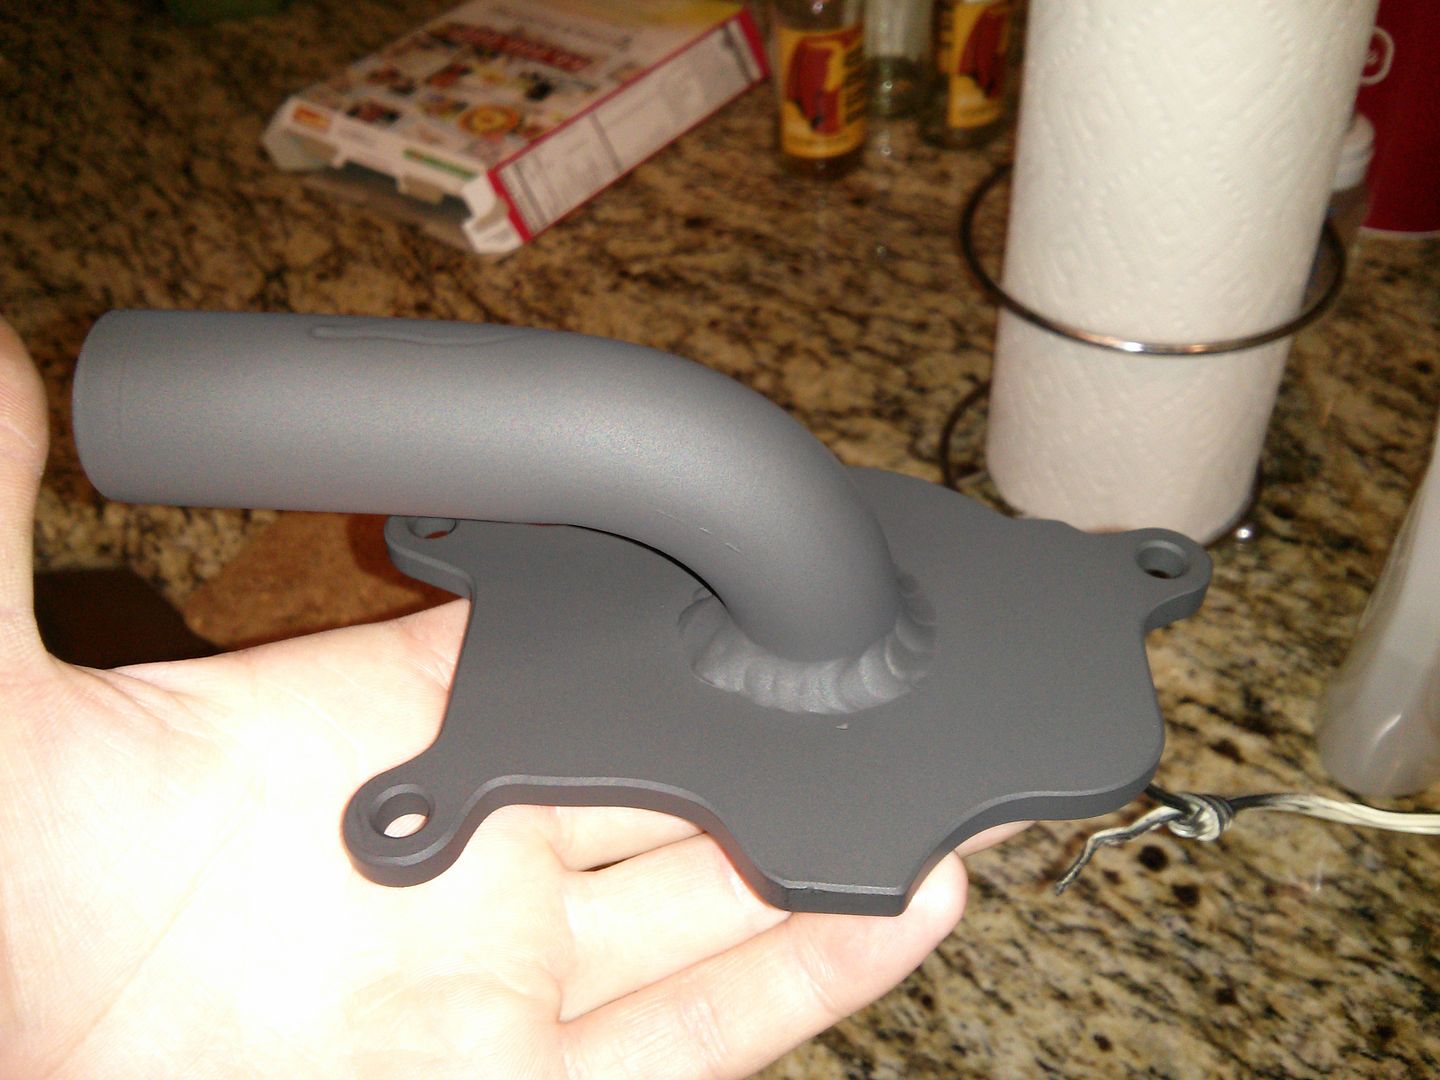 Here's the new plate installed with a measure of the length of the tangent. 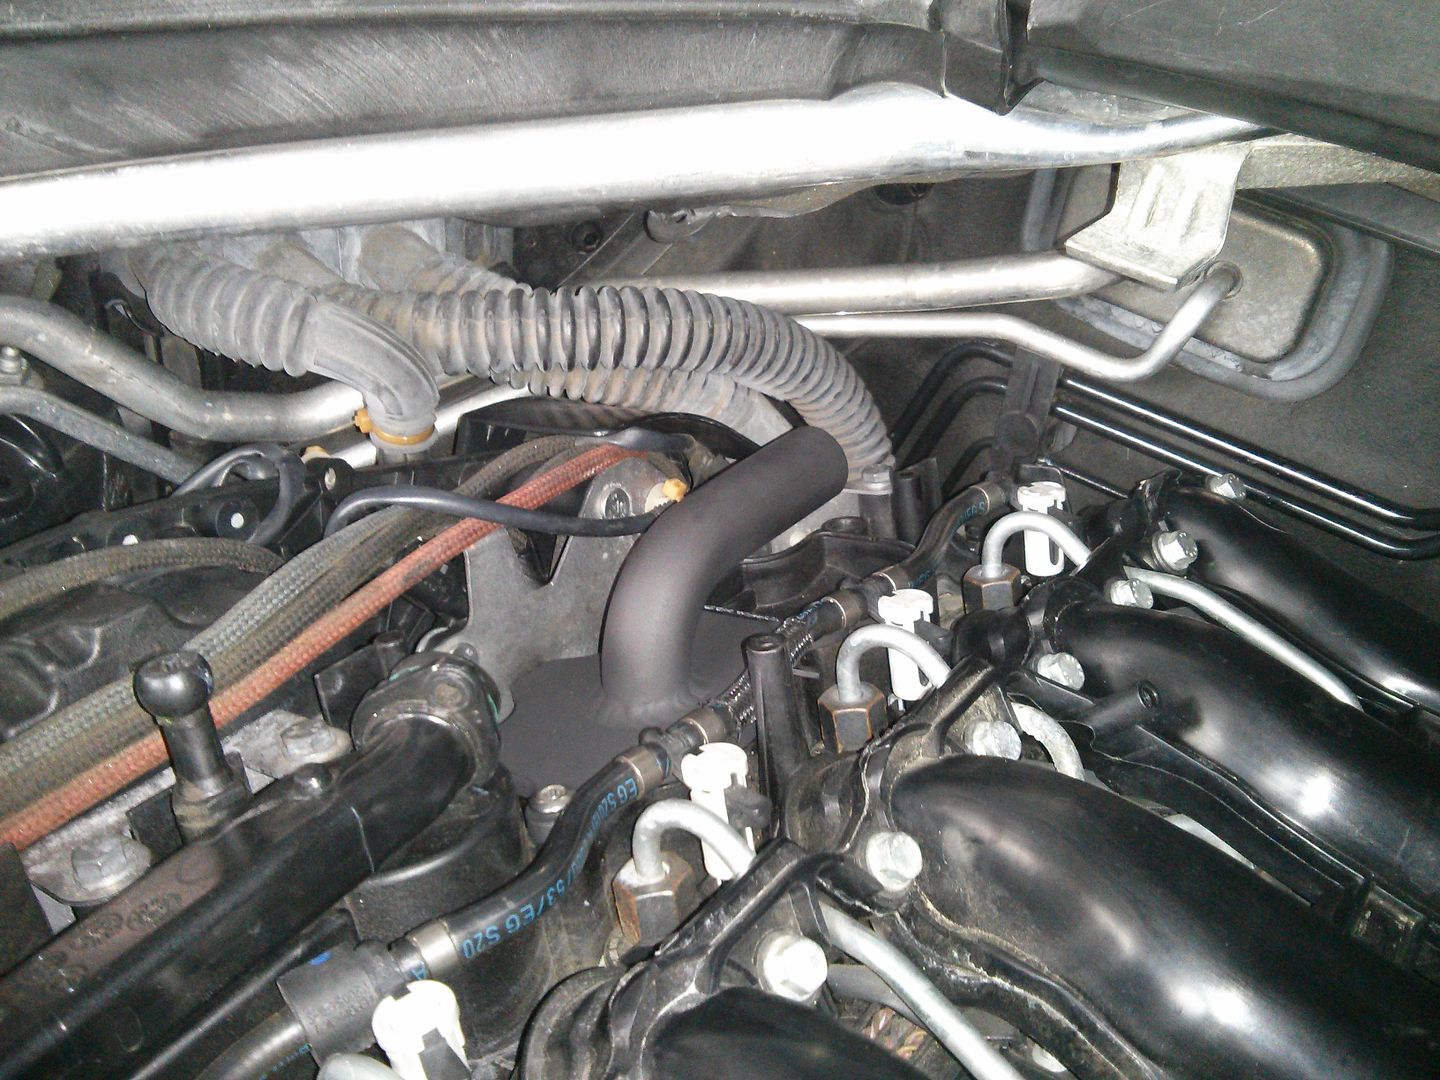 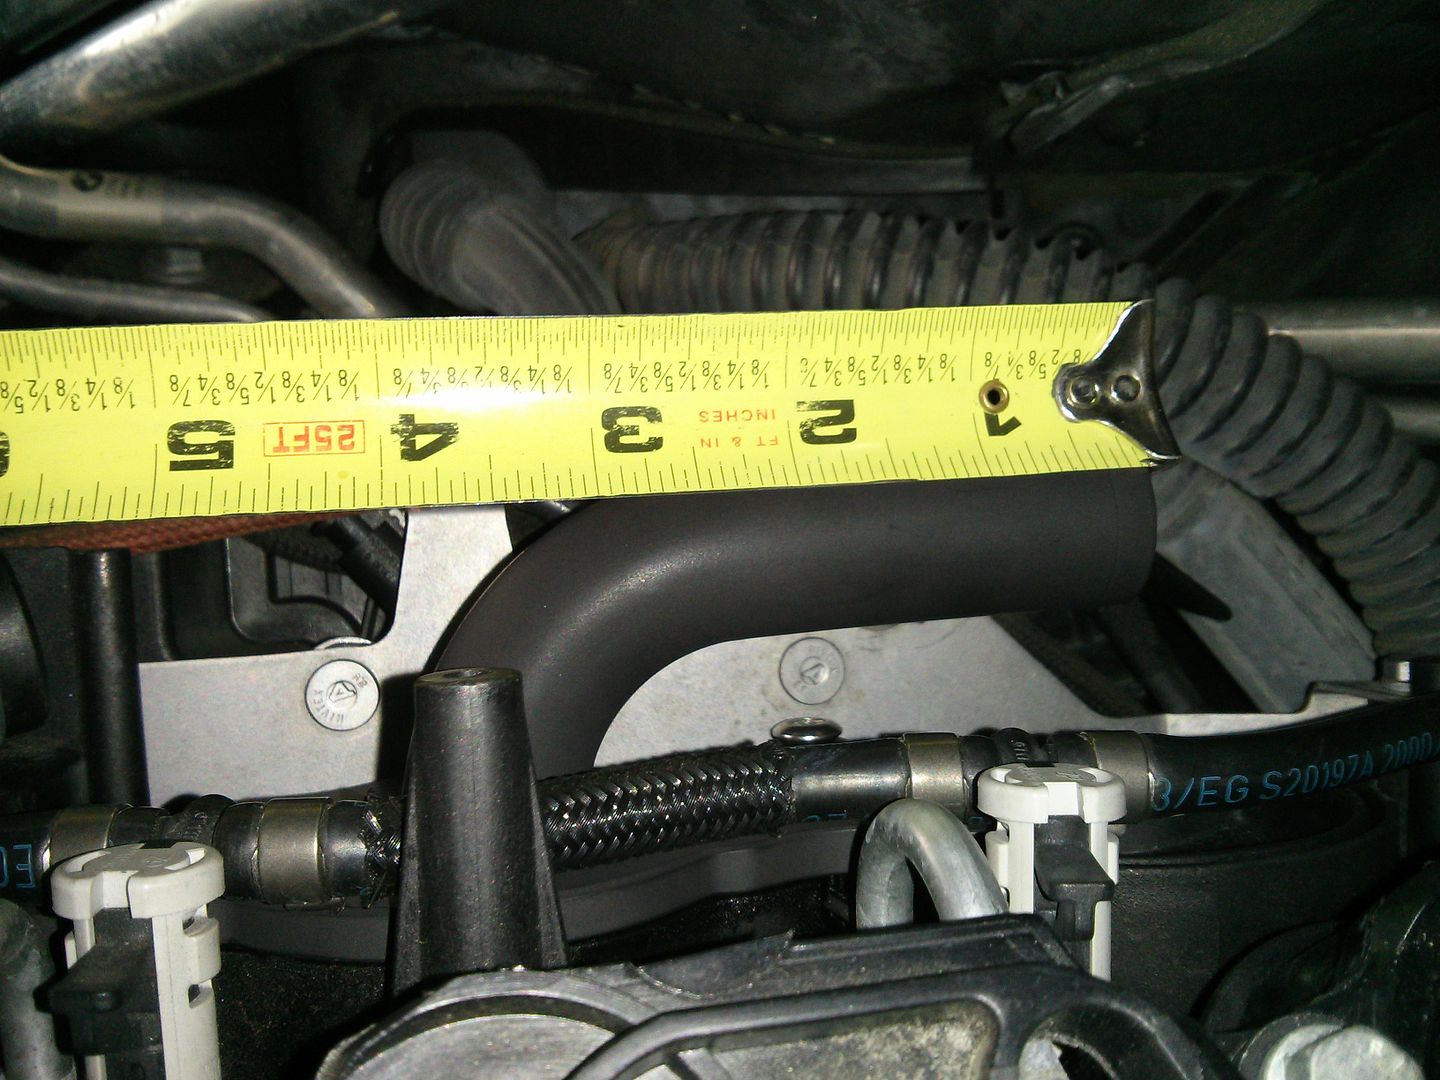 THE HOSES I'm still struggling a bit with finding the proper hoses. For now, I'm using a length of heater hose. It runs $3 per foot so it's cheap, but I'm unsure of its resistance to oil. We'll cross that bridge once we get there. For anyone reference the two hoses are 23" and 29.5" long respectively. 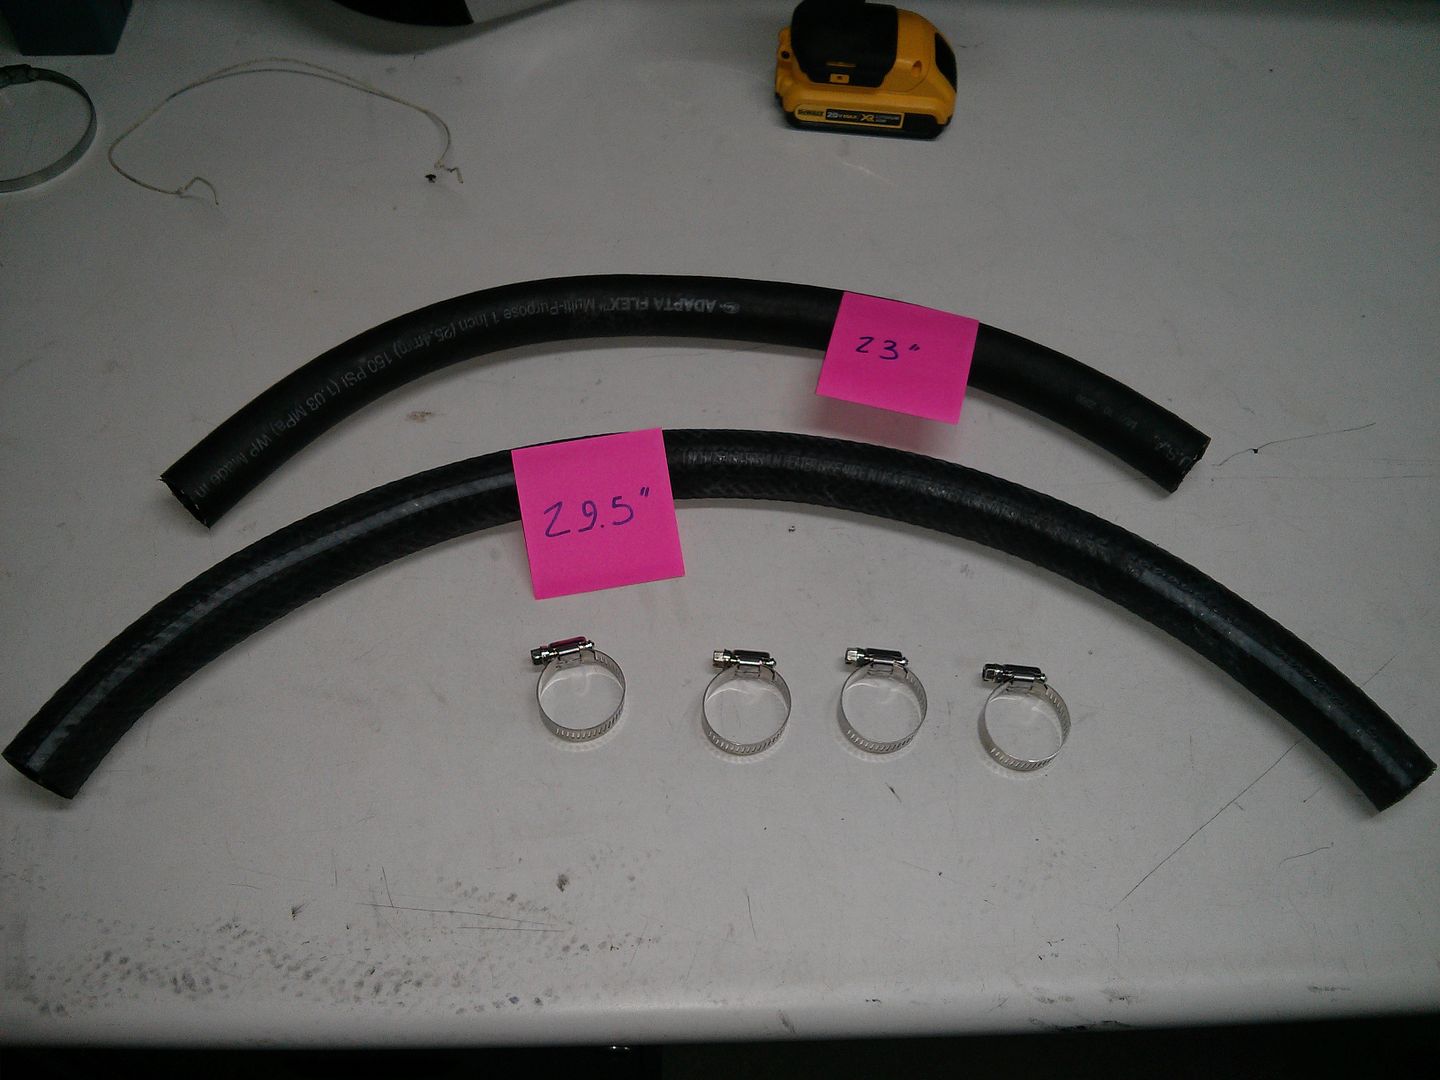 Update 4/22/2015: sgrice found some great hoses the appear to be precisely what is needed for this job. Read about below at #20 or click here -> http://www.xoutpost.com/1035221-post20.html
__________________
Last edited by ZetaTre; 04-22-2015 at 12:49 PM.
|
|
| Bookmarks |
| Thread Tools | |
| Display Modes | |
|
|
|
|


 Hybrid Mode


