
|
|
|
|
||||||||||
| Xoutpost server transfer and maintenance is occurring.... |
| Xoutpost is currently undergoing a planned server migration.... stay tuned for new developments.... sincerely, the management |
 |
|
|
LinkBack | Thread Tools | Display Modes |
|
#21
 03-21-2016, 10:28 PM
|
|||
|
|||
|
Well, I didn't get far today because I could not get the half shafts out of the diff... The thought was to get the half shafts out, put the suspension back together so I can roll the X out of the garage after I have the motor out of it. So, what is the process here? Gotta get the inner CV joints out of the diff to get the diff and opposite side support off the oil pan so I can get the silly thing out of the truck (I know it isn't a truck, but I just call it that for simplicity)... I have only seen one reference that has this process, but I can't get the inner CV joint out on either side... Oh, I'm also missing one of the two spindle to strut nuts on the driver side. Noticed it was missing when I started to tear it apart today... Oil pan bolts were loose... I wonder what else has been poorly put back together...  Oh, I did manage to get the crank bolt out with my 1/2 in drive impact... It did take a little while, but it finally started to move... WIN!!  I'll update more tomorrow if I can figure it out... Cheers all!! Last edited by williamx5; 12-18-2017 at 04:00 AM. Reason: added pictures... 
|
| Sponsored Links | |
|
|
|
|
#22
03-22-2016, 11:55 AM
|
|||
|
|||
|
Good day all!!
This is where I got last night... Got this out...  But left this in cause I couldn't get it free...  And this is where I stopped last night...  Will dive into it more when I get home this afternoon... Cheers all!! Last edited by williamx5; 12-18-2017 at 04:12 AM.
|
|
#23
03-24-2016, 12:26 AM
|
|||
|
|||
|
Good day all!
I didn't get anything done yesterday, but today was a different story!! Figured out how to get the half shafts out... Was going to pull the front diff, but the top bolt is right next to the motor mount and is too hard to get at... Once the pass side half shaft is out, the starter comes out rather easily. Torque converters bolts, bell housing bolts, motor mounts, and oil cooler lines into the block (I forgot about those until it was keeping the motor from moving forward while pulling it)... Here are some pictures...   And finally the motor is on its way out!! I broke the silly connector for the left valvtronic position sensor... Just the connector locking tab though...    Trans is sitting on the sway bar which works out great for me to move it if needed!! And I have no idea how anyone gets that front drive shaft out without taking out the T-case or diff!!  I had to put spacers to clear the flywheel... I can't wait to see the internals!!  Don't forget about this bolt!! I hope I didn't bend the tubes on mine...  Hard to read with all the oil and dirt... Of course as soon as I clean it off, it will be a white sticker...   Had to put this 3/4 drive socket on here to rotate the crank...  And where I stopped for the night!! I gotta get some parts cleaner for my washer. I'm sure I will need a lot of it!  Until tomorrow!! Cheers all!! Last edited by williamx5; 12-18-2017 at 04:21 AM. Reason: Picture issues!
|
|
#24
03-24-2016, 02:49 AM
|
||||
|
||||
|
If it was my project.....I'll remove the front bumper..headlights...rad support...etc. and will be a lot easier to strip-out the motor and tranny.
This way get you plenty of room to manoeuvre stands and jacks. Nevertheless....Awesome work!
|
|
#25
03-24-2016, 08:32 AM
|
|||
|
|||
|
Halfshafts should just pop out of the diff; I've always just smacked the edge of the large rectangular bit that houses the tripod joint with a brass punch and a drilling hammer.
Quite the project; cant wait to see what #6 looks like.
__________________
12 E70 3.5i xDrive 03 E46 330i ZHP 01 E53 3.0i 98 E36 323is 12 Audi A4 Quattro 79 Triumph Spitfire 73 MGB
|
|
#26
03-24-2016, 08:48 AM
|
||||
|
||||
|
Quote:
Good luck with your project. Please keep up with updates.
__________________
 2012 X5 x35i My new toy 2005 X5 4.4 Her's (Retrofitted Servotronic Steering Rack) 2003 X5 3.0 Mine (Retrofitted Servotronic Steering Rack and Heated Steering Wheel) 2001 M5 Son's car 2000 540i 6sp Sports pkg, supercharged. Son's car (Sold) 2001 530i (Sold) 1999 528i (Sold) 1975 2002 (Sold)
|
|
#27
03-24-2016, 11:11 AM
|
|||
|
|||
|
Good day all!!!
Just about ready to start on the motor... I also need to fire up my pressure washer today... That engine bay needs a serious bath!! Quote:
Quote:
 I actually figured the half shafts were the same between left and right... And there was an extension piece that went through the oil pan... So, I feel sorry for the one that has to replace the right side half shaft!!! That thing is probably twice as much as the left side! Quote:
Thanks all!! I'll keep the updates coming!! Last edited by williamx5; 12-18-2017 at 04:25 AM.
|
|
#28
03-24-2016, 11:31 AM
|
|||
|
|||
|
Quote:
Do yourself a favor and replace the halfshaft seals while you have them out... one on the front diff, the other on the aluminum extension bracket. They're only a few bucks each. And maybe the o-ring between the diff and the pan on the driver side.
__________________
12 E70 3.5i xDrive 03 E46 330i ZHP 01 E53 3.0i 98 E36 323is 12 Audi A4 Quattro 79 Triumph Spitfire 73 MGB
|
|
#29
03-24-2016, 08:18 PM
|
|||
|
|||
|
Good day all!!
And the outcome for today! Lots of pictures, so please don't shoot me!! First and foremost, I cleaned the operating room!! And arranged all my tools for easy access...  Off comes the cam shafts...  I actually have this one upside down so you can see the engraving... It says RA3... That is R=right side in relation to facing the motor (not like if you were sitting in the car). A=Auslauf (German for outlet). And 3 is the third cap from the front... There is also RE1... E=Einlass (German for inlet). Additionally, the caps that have the oil line holders like this one are very hard to get turning... So, don't think there is something wrong if they take more force to get moving...  This is the Driver Side (DS)... The exhaust cam bolt was terribly loose for some reason... I didn't think to check the timing prior to pulling it apart cause I figured the noise I heard was from the bottom end... It was not the bottom end...  And the cams are out... The exhaust manifolds are off... Motor mounts are off... Valley pan is off... All bolts back where they came from... Valley pan bolts were terribly nasty so I left them off...    And where the parts are going... I had labeled them R and L, but that is prior to figuring out they don't correspond to the right and left of the car...  This is where I put the lifter and rocker for each position... With the help of my better half, we labeled these RE12, RE23, RE32, RE34, RE43, RE45, RE54, and RE5-...... I will explain it if anyone needs me to... I did that for all four rows (RE, RA, LE, and LA)....  Don't forget these bolts when pulling the heads... The head will NOT come off if these are still in place... Really!! I tried...   Here is the first viewing with the gasket in place... First the PS or left, then the DS or right...       And a close up of the concerns!! I'll post some older pictures that reveal the timing was indeed off, I just didn't notice it at the time!    Here are the older pictures of the timing... They aren't the best, but I think you will be able to make out the position of the flats on the cams... First the PS that is in time, then the DS that is off... Not sure by how much by looking at the picture, but they are NOT in time...  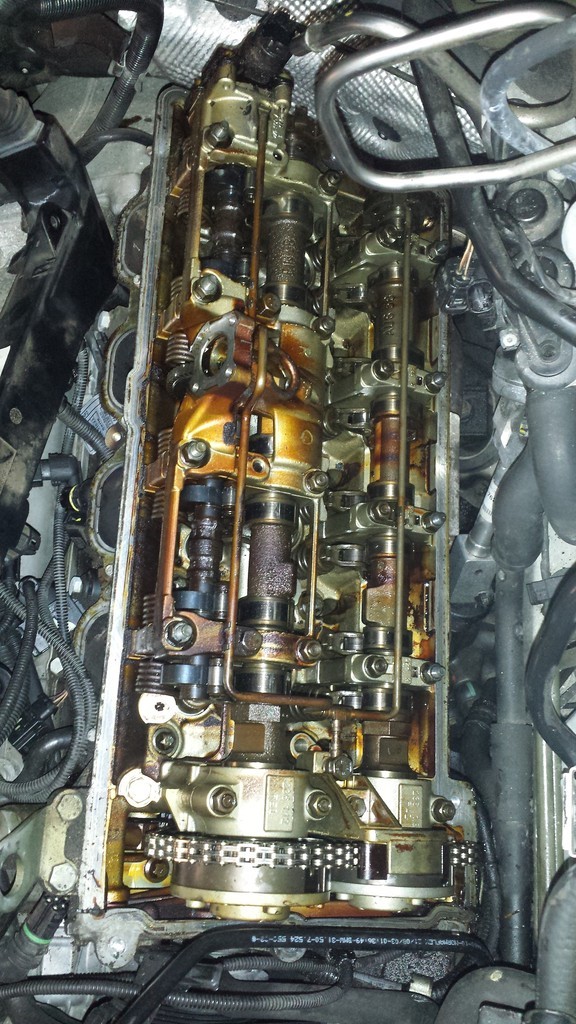 Here is the damaged head... Only valves at this point... I hope that is the extent of the damage as these valves didn't hit hard enough to damage the piston...   The other head is fine...   Here is the block under the gaskets... No cracks!!   And here is the crazy water gasket that always fails... This looks worse than just normal failure... Not sure how it got like this... Reused?!    And finally, the bottom... Don't get stressed if you encounter some oil pan bolts that take time to come out... only five or six of mine were an issue, but that's cause they had some blue lock-tight stuff on them...  I put the oil pump bolts back where they came from...   So, that is where I stopped... The real question is do I tear it down more?! All the caps seem to be tight and the crank turns effortlessly with no pinging of any kind... The impressions on the top of the pistons are hardly noticeable and the valves that are bent are barely bent... I personally think I can get away with keeping the bottom end as is and rebuilding the heads... Replace all gaskets and call it good... Your thoughts please!!! Cheers!! Last edited by williamx5; 12-18-2017 at 04:46 AM.
|
|
#30
03-25-2016, 01:25 AM
|
||||
|
||||
|
Go for the whole hog!
You're almost there! A full rebuild will keep your sanity and your SAV will live a lot longer! Snap!..........forgot the tranny. 
|
|
| Bookmarks |
|
|
|
|


 Linear Mode


