
|
|
|
|
||||||||||
| Xoutpost server transfer and maintenance is occurring.... |
| Xoutpost is currently undergoing a planned server migration.... stay tuned for new developments.... sincerely, the management |
 |
|
|
LinkBack | Thread Tools | Display Modes |
|
|
|
#1
 05-08-2013, 09:01 AM
|
||||
|
||||
|
Quote:
Update from last night although I didn't do much, I know everyone hammers the axle out of the hub but I'm not a fan of that in case the punch slips and damages the axle threads or something else. But I used the axle flange for the slide hammer and the threaded rod in the kit which is used with a hub puller and "pushed" the axle inwards out of the hub, very easy to do. Tonight I will have more time to play, need to disconnect the strut but waited to do that until I got the axle pushed inwards, and swing the hub carrier forward so I can get the axle out of the way, then I will hammer the hub out of the carrier tonight hopefully and press a new bearing in.
__________________
2018 Ram 2500 6.7L Cummins 68RFE 19k miles -Bright White/Black - Big Horn Sport - Crew Cab Short Bed 2013 X5 35D (CEO's) - Born on 5/17/2013 - 82k miles - Alpine White/Cinnamon Brown/Premium Pkg, Sport Activity/Premium Pkg and Sound/20" Style 214/Running Boards 
|
|
#2
05-08-2013, 01:20 PM
|
||||
|
||||
|
I made the mistake of pressing on the outer ring,
 see picture. I know common sense, but it happen. see picture. I know common sense, but it happen.
__________________
2010 X6 50i 2005 X5 3.Oi, Many Options  2015 HONDA CR-V EX-L 1998 ACURA 2.5TL MODs - Driver's outside mirror light - Voice Recognition Module - Blaupunkt Entertainment System with Digital TV
|
|
#3
05-08-2013, 01:30 PM
|
||||
|
||||
|
Quote:
I was under the impression that when you press the new bearing in the wheel carrier you should use a disc that covers most of the bearing, so that it doesn't separate, then when it is seated and time to drive the hub in, to use a smaller disc on the back of the bearing to drive the hub in, and only put pressure on the inner race (inner ring) then?
__________________
2018 Ram 2500 6.7L Cummins 68RFE 19k miles -Bright White/Black - Big Horn Sport - Crew Cab Short Bed 2013 X5 35D (CEO's) - Born on 5/17/2013 - 82k miles - Alpine White/Cinnamon Brown/Premium Pkg, Sport Activity/Premium Pkg and Sound/20" Style 214/Running Boards Last edited by Ricky Bobby; 05-08-2013 at 01:59 PM.
|
|
#4
08-20-2016, 11:15 PM
|
|||
|
|||
|
Quote:
Ended up seeing your post trying to figure out why the hub was so loose. Removed the flange which destroyed the new bearing. Removed the bearing and pressed in a new one, then used your tip to press only using the inner part of the bearing and it worked like a charm. I had the same symptoms as the OP. Right curves made the vibration disappear. Did a test drive and all is smooth. I had bought two bearings just in case it was the left one, but I am good still. First time doing a wheel bearing. What a bear on these X5's.
__________________
_____________________ 2004 Gray/Gray 3.0 X5
|
|
#5
01-26-2019, 03:13 PM
|
|||
|
|||
|
Quote:
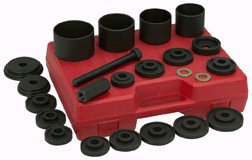
For the FRONT bearing, in order to press out the OUTER race (once the circlip is removed), what is the best removal kit? On ebay/amazon, I see different kits such as 19-piece, 23-piece etc. Can you post a photo or the exact kit for the FRONT bearing? Thanks! PS: Amazon has the "Orion Bearing Tool" for $65, does this work? ---
__________________
1998 E39 528i 5sp MT 2006 E53 X5 3.0 6sp MT
|
|
#7
05-09-2013, 08:50 AM
|
||||
|
||||
|
Thanks for the tips, jeez one can get confused here I'm surprised the harbor freight tool didn't come with directions, but for the low prices it makes sense lol!
__________________
2018 Ram 2500 6.7L Cummins 68RFE 19k miles -Bright White/Black - Big Horn Sport - Crew Cab Short Bed 2013 X5 35D (CEO's) - Born on 5/17/2013 - 82k miles - Alpine White/Cinnamon Brown/Premium Pkg, Sport Activity/Premium Pkg and Sound/20" Style 214/Running Boards
|
|
#8
05-09-2013, 09:32 PM
|
||||
|
||||
|
UPDATE:
So I disconnected the strut, ziptied the axle out of the way so the back of the carrier has access, then popped the 2 strut bolts back in place to the carrier was upright. I proceeded to do a whole lot of wire brushing on the axle/hub splines and went to work constructing my DOUBLE BRUTAL slide hammer. I have 2 rental slide hammers right now, put both 5 lb weights together on one rod with the flange attached to the hub with 3 lug nuts, and started BRUTAL HAMMERING. I counted the whacks, at 34 the hub popped off. Probably would work just as well with the one 5 lb weight, just might take more whacks  Pic of my DOUBLE BRUTAL HAMMER, I have two of the below, I just put both weights on one rod (thats what she said) 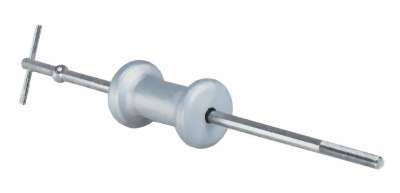 The circlip was being a pain, as one side was rusted pretty bad in place in the carrier, ended up getting one side out and put my vice grips on to pull the rest out, circlip pliers weren't working so well. Took out the dremel and started wire wheeling the rust off, got most off, but for the heavier stuff i'll use a sanding attachment on. As expected the inner race comes out stuck to the hub. Used the cut-off wheel and drilled a nice slot in the race, took a few mins going slow and making sure not to nick the hub or go too deep too quick. Using my handy industrial chisel/punch set from harbor freight ($10!) I took a nice FAT chisel and whacked the slot, that cracked it loose enough to slide off the hub, no a single lick of damage whatsoever so I will reuse the hubs, just want to clean up the rust better, especially on the inside of the hub where the axle nut is, thats where I have to use a sander bit to get the heavy stuff off. Doesn't matter really since its cosmetic but I want to get them as clean as possible. Oh yeah, don't go cheap on this job and spend the extra 8 bucks to get 2 new dust covers, mine are rusted more than a car being dipped in salt every day. The old ones are pressed in place with the hub, just give a few whacks to the back and they pop off too. Now I was all ready to pull out the old bearing using the harbor freight Bearing press kit, but I found out the huge honking nut for the kit is too bit for any of my wrenches/sockets. My wrenches go up to 1 1/8", sockets go up to 1". A return trip to harbor freight should rectify that, going to pick up a 3-4 lb mini sledge as well, never know when another BRUTAL HAMMER is needed, especially since after the bearings are in place, I'm going to do my outer CV boots before the axle gets driven back into the hub. I DO NOT want to go through this much disassembly again any time soon! Making a hell of a mess in the garage but having fun so far, and learning a lot about my X! So just so I have this correct, when I press the new bearing in, I use a disc that covers the ENTIRE WHOLE WIDTH of the bearing so the pressure is spread evenly? Then when the hub gets driven in I use a disc on the backside that only puts pressure on the INNER race? One chance to get this right! haha
__________________
2018 Ram 2500 6.7L Cummins 68RFE 19k miles -Bright White/Black - Big Horn Sport - Crew Cab Short Bed 2013 X5 35D (CEO's) - Born on 5/17/2013 - 82k miles - Alpine White/Cinnamon Brown/Premium Pkg, Sport Activity/Premium Pkg and Sound/20" Style 214/Running Boards
|
|
#9
05-09-2013, 09:52 PM
|
||||
|
||||
|
Quote:

__________________
2010 X6 50i 2005 X5 3.Oi, Many Options 2015 HONDA CR-V EX-L 1998 ACURA 2.5TL MODs - Driver's outside mirror light - Voice Recognition Module - Blaupunkt Entertainment System with Digital TV
|
|
#10
05-09-2013, 10:25 PM
|
||||
|
||||
|
Great work; keep up the updates! (pics would be nice too.
)FYI: Pawn shops are also a great place to pick up oddball tools. I frequent a couple of shops near me and snag decent looking wrenches when I see them. They are usually just tossed in a bin marked $1 each. The e28 and e32 require a special tool to get at one of the nuts on the upper control arm; I bought a 1 1/8" combination wrench and modified it slightly with a grinder to fit the application. Best $1 spent ever.
__________________
2001 X5 Sport 3.0/5-speed 1998 318ti/5-speed 1988 735i/5-speed 1984 528e/5-speed (soon to be M20B25-powered 525i!)
|
|
| Bookmarks |
| Thread Tools | |
| Display Modes | |
|
|
|
|


 . Make sure you press the new wheel bearing on the correct ring. I destroyed the new bearing when I pressed it in and didn't noticed it until everything was put together and my X5 front wheels started shaking. Good Luck
 ...
...


 Hybrid Mode


