
|
|
|
|
||||||||||
| Xoutpost server transfer and maintenance is occurring.... |
| Xoutpost is currently undergoing a planned server migration.... stay tuned for new developments.... sincerely, the management |
 |
|
|
LinkBack | Thread Tools | Display Modes |
|
#1231
 03-19-2018, 11:29 AM
|
|||
|
|||
|
back up camera
Bought the camera you recommended. I however sourced the power for the camera from the back up lights. I also carried that power to the front on a separate cable and ran it along with the video cable to my head unit. The reason being is with the Pioneer HU has a purple wire for reverse that supposedly needs 12v. I do have 10.2 volts coming to the front on that cable I ran and the same amount supposedly being supplied to the camera. As you know the camera connection wires coming from the camera end at a male and female connection small type connector. The problem is I do not have a picture on the screen. I did not have time yesterday to check that funky little connector for power because of course it is in the hatch trim. There is a red wire that is also molded into the rca jack by the head unit does this require 12v.? The wiring schematic that came with the camera is horrible and makes little sense. Can you shed some light? As of now I believe I just have a bad camera. 
|
| Sponsored Links | |
|
|
|
|
#1232
03-19-2018, 01:37 PM
|
||||
|
||||
|
Before I give wiring recommendations do you have a link to the camera you went with. This thread has a few different cameras and I want to be sure were on the same page so to speak

__________________
Just BMW's - All cars and trucks was two pages long 1994 318is 1997 528i 2000 323i 2001 X5 3.0 auto 2005 X5 3.0 auto 2011 535xi auto 2013 X5 xdrive35 Turbo More are at my website Aftermarket E53 Radio Install
|
|
#1233
03-19-2018, 03:31 PM
|
||||
|
||||
|
I have had the Seicane 9" screen version installed for sometime. Thought I should recap the install.
I chose to use the same route to the rear as I did when I installed the Mediabridge. I went down the driver's side behind the console side trim. I lifted the carpet at the seam under the driver's seat and routed the cable to the side trim under the door. I removed the trim pieces under the front and rear doors and slide the cable under the carpet. I pulled the bottom out of the plastic trim between the front and rear doors to get the cable under the carpet around the door post. The only upholstery piece I removed to do the install was the small piece on the driver's upright portion of the rear seat, from there it is easy access to the rear. For the backup camera I tapped into the wires at the front for power. I ran the wire for the backup that is on the Seicane harness to the corresponding camera wire in the rear and grounded the camera in the rear compartment. I install RCA splitters so I can activate the camera when not in reverse connecting them to video in on the unit. I installed the camera in the center of the pullout piece where the trailer hitch goes. I drilled straight though the plastic to get into the rear. I used a grommet and silicone to seal the access. Camera is the Sony camera offered by Seicane. I added a USB hub so I could add a phone charger line. There are only two USB on the unit. I had to remove the IBUS app with DSP. IBUS alone works fine. The DSP portion was a second equalizer conflicting with the equalizer in the Seicane. In the initial install I only had sound for 20 seconds. After many attempts at correcting the problem I took it to a custom audio shop. It wasn't just one issue it was several that when combined required the experience of several techs to unravel. One problem was my DSP amp that I ended up replacing. If not for the DSP amp malfunction I think it would have been a fairly straightforward install. Seicane instructions and tech help are useless IMO. This thread was very helpful though no one had the same unit and DSP so suggestions were not always applicable. After all the problems I am still very happy with the Seicane. Great upgrade! Sound quality is much better, like being able to use torque and several other apps. Like the included navigation.
__________________
 X5 4.6 2002 Black Sap, Black interior. 2013 X5M Melbourne Red, Bamboo interior X5 4.6 2002 Black Sap, Black interior. 2013 X5M Melbourne Red, Bamboo interiorDallas Last edited by bcredliner; 03-19-2018 at 04:06 PM.
|
|
#1234
03-19-2018, 03:41 PM
|
||||
|
||||
|
Quote:

__________________
Wayne 2005 BMW X5 3.0d (b 02/05) 2001 BMW F650GS Dakar (b 06/01) 
|
|
#1235
03-19-2018, 03:51 PM
|
||||
|
||||
|
1- more than enough room to pull cable up the drivers side of the radio opening
2- pop out trim to route to carpet seam 3- lift carpet up enough to slide cable under 4- pop off door trim to put cable under carpet 5- pop out bottom of the trim around the center and under the door 6- pop out top of rear seat and pull cable through to rear 7- remove CD/Nav door and to pull cable through 8 Route cable between existing opening and connect. 9- Camera access behind trailer hitch door 10-Camera bolted to bottom of hole in pop out door.
__________________
X5 4.6 2002 Black Sap, Black interior. 2013 X5M Melbourne Red, Bamboo interiorDallas Last edited by bcredliner; 03-19-2018 at 04:02 PM.
|
|
#1236
03-19-2018, 04:04 PM
|
||||
|
||||
|
Install front and side view.
__________________
X5 4.6 2002 Black Sap, Black interior. 2013 X5M Melbourne Red, Bamboo interiorDallas
|
|
#1237
03-19-2018, 04:36 PM
|
||||
|
||||
|
I was wondering how well it cleared the dash vents but it looks good.
__________________
Just BMW's - All cars and trucks was two pages long 1994 318is 1997 528i 2000 323i 2001 X5 3.0 auto 2005 X5 3.0 auto 2011 535xi auto 2013 X5 xdrive35 Turbo More are at my website Aftermarket E53 Radio Install
|
|
#1238
03-20-2018, 08:49 AM
|
|||
|
|||
|
Quote:
T
|
|
#1239
03-20-2018, 09:15 AM
|
||||
|
||||
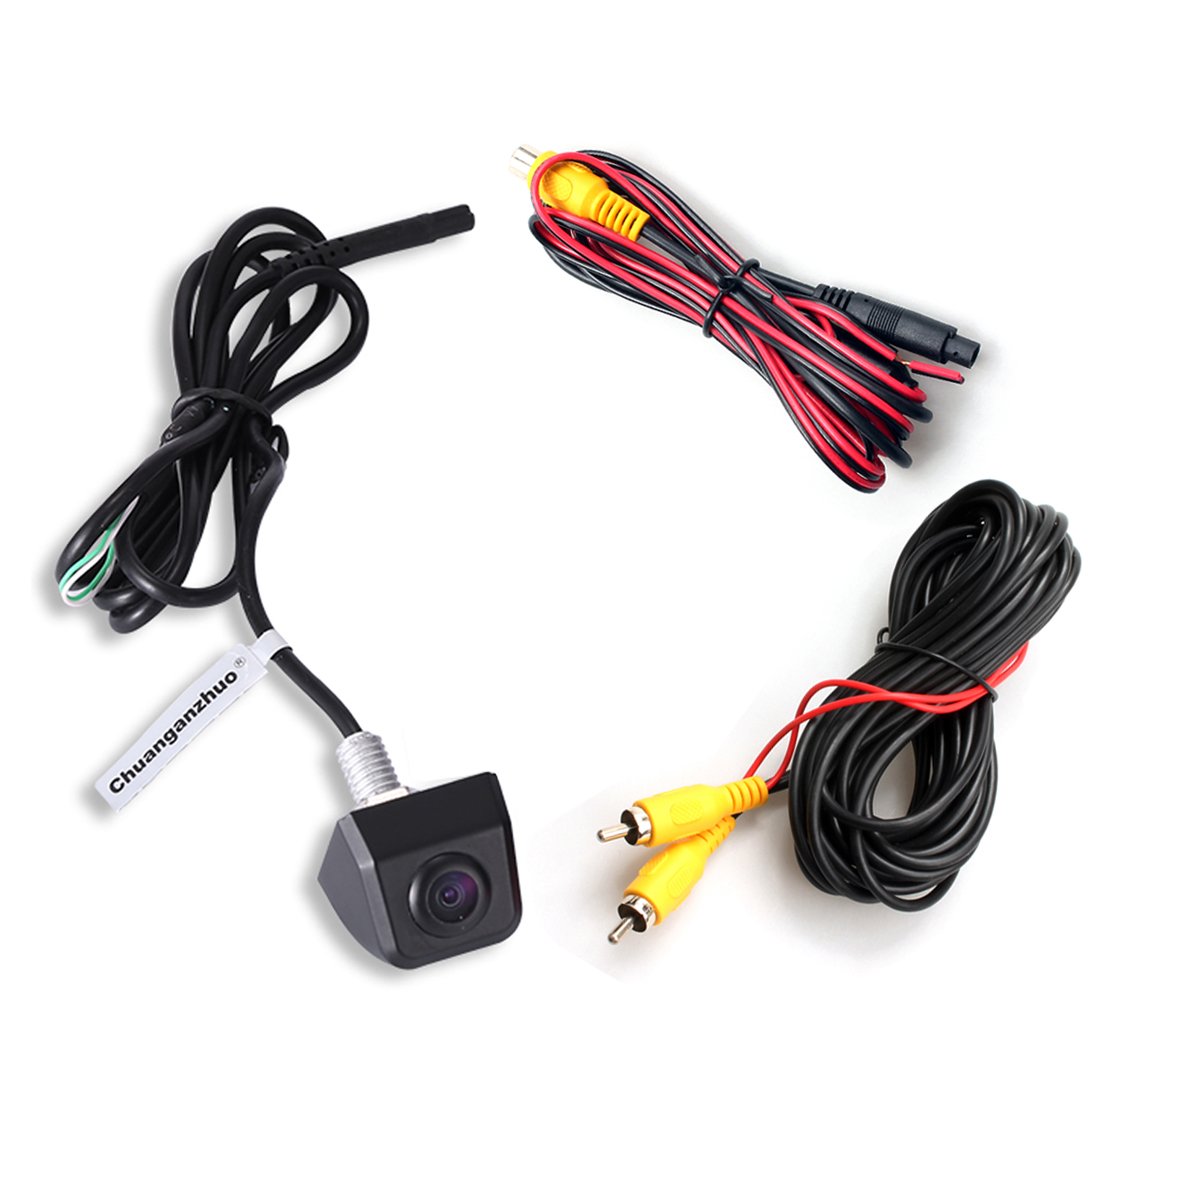 The bundle of cables in the top right of this picture has the red and black wire that is power and ground for the camera. You attach that wire to the lower cable bundle to bring the red wire to the front and connect the ground from the top bundle to a ground spot in the rear. Only the power wire makes it to the front via the bottom rca cable bundle.
__________________
Just BMW's - All cars and trucks was two pages long 1994 318is 1997 528i 2000 323i 2001 X5 3.0 auto 2005 X5 3.0 auto 2011 535xi auto 2013 X5 xdrive35 Turbo More are at my website Aftermarket E53 Radio Install
|
|
#1240
03-21-2018, 11:34 AM
|
|||
|
|||
|
Quote:
Thanks for responding back. So this is how I wired mine. Having never saw a power wire incorporated into a rca jack I for some reason put that connection at the head unit. However I did run a separate red/blk wire to the H.U. to pick up the purple reverse wire for the head unit. So my connections for power come from the backup lights to the camera and to the head unit. I do have voltage present in the form of 10.2 volts. If I am reading your instructions correctly you also powered up the red wire to the rca jack. Is that not correct. I do get the head unit to go into camera mode on the screen but it is a black screen. Thank you for your help. T thank you for your help
|
|
| Bookmarks |
|
|
|
|


 Linear Mode


