
|
|
|
|
||||||||||
| Xoutpost server transfer and maintenance is occurring.... |
| Xoutpost is currently undergoing a planned server migration.... stay tuned for new developments.... sincerely, the management |
 |
|
|
LinkBack | Thread Tools | Display Modes |
|
#501
 12-03-2010, 02:37 PM
|
|||
|
|||
|
In case you're wondering, I've bought the 2 power supply units (22A each) from ebay at £60 all in, ammeter + shunt were about £15 and the project box/leads/connectors etc. some £20. 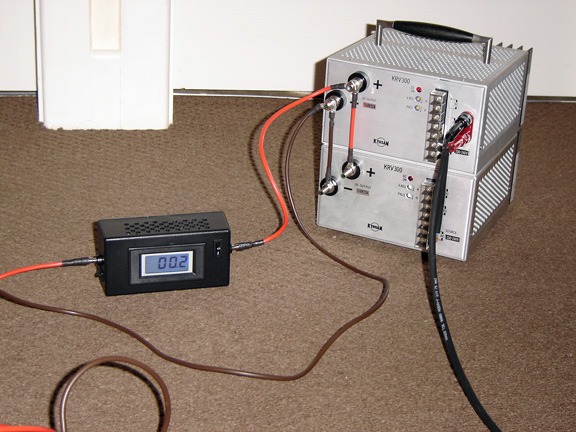

|
| Sponsored Links | |
|
|
|
|
#502
12-03-2010, 03:05 PM
|
||||
|
||||
|
Quote:

|
|
#503
12-03-2010, 03:35 PM
|
|||
|
|||
|
Quote:
The only thing I would point out is when you buy, you guys make sure the spec mentions 'continuous' otherwise it might be max. which means you'll be getting about half your money's worth. Or worse, might not do the job.
|
|
#504
12-22-2010, 09:22 PM
|
||||
|
||||
|
Quote:
Thanks!
|
|
#505
12-22-2010, 09:40 PM
|
||||
|
||||
|
Quote:
__________________
04 X5 4.8is 76 2002 X-Pipe and Dinan Mufflers: www.youtube.com/watch?v=eWQh-izaTcY Pics http://www.flickr.com/photos/stevenb...7607968312734/
|
|
#506
12-24-2010, 10:23 AM
|
||||
|
||||
|
Quote:
|
|
#507
12-24-2010, 12:06 PM
|
||||
|
||||
|
FWIW
Peake have a new computer interface on the drawing board for the owner/DIYer market. I don't have any more details than this but, considering the trouble most seem to experience with the far eastern clones, that's where I'll be investing my $$$ when the time comes. I now return this thread to its rightful owners!
|
|
#508
12-24-2010, 05:41 PM
|
||||
|
||||
|
Quote:
If I'm not mistaken, you will NOT see any free diagnostic head if it's ALREADY SEEN by the system. Do you see the green bar indicating the system can see the diagnostic head? Do you have a manual trans? If so, you have to put it in neutral. Any way to get a screen shot of what you are seeing at the main DIS screen? Assumptions, correct me if any of these are wrong: 1) You are using vmware. What version are you using? 2) You have the round OBD connector in the engine compartment. 3) When you try the GT1, you are actually connecting the GT1 to the round OBD connector under the hood (not the one under the dash).
|
|
#509
12-24-2010, 06:16 PM
|
||||
|
||||
|
Thanks a million for your reply:
Do you see the green bar indicating the system can see the diagnostic head? nope, the system isn't seeing anything no bars at the top whatsoever. Do you have a manual trans? If so, you have to put it in neutral. nope, auto tranny. Any way to get a screen shot of what you are seeing at the main DIS screen? I will post some tomorrow, when I play some more with it. Assumptions, correct me if any of these are wrong: 1) You are using vmware. What version are you using? 2.5.2 2) You have the round OBD connector in the engine compartment. yup, round connector under hood ( only thing to notice here, should I have a female #15 in the connector??) 3) When you try the GT1, you are actually connecting the GT1 to the round OBD connector under the hood (not the one under the dash). Correct !
|
|
#510
12-24-2010, 06:51 PM
|
||||
|
||||
|
Quote:
|
|
| Bookmarks |
| Tags |
| gt1 setup |
|
|
|
|


 Linear Mode


