
|
|
|
|
||||||||||
| Xoutpost server transfer and maintenance is occurring.... |
| Xoutpost is currently undergoing a planned server migration.... stay tuned for new developments.... sincerely, the management |
 |
|
|
LinkBack | Thread Tools | Display Modes |
|
#1791
 02-17-2013, 07:38 AM
|
||||
|
||||
|
Quote:

|
| Sponsored Links | |
|
|
|
|
#1792
02-17-2013, 06:57 PM
|
||||
|
||||
|
After successfully upgrading my Nav firmware from its original V26 (4-1/60) to V32 (4-1/00) (thanks to the links for burning a DVD in the Nav forum)...found & purchased 2012 BMW Nav DVD set (east & west) for $30 on ebay.
 BTW...love the "perspective" view with the horizon off in the background...I find it very interesting...but it doesn't display street names like in the other views. Does this change with updated maps? Guess I'll see soon when my 2012 map DVDs arrive.
__________________
Become a BMW CCA member! Click HERE to join and feel free to use my BMW CCA member #191509 as a referral.

Last edited by Qsilver7; 02-18-2013 at 08:46 AM.
|
|
#1793
02-18-2013, 02:01 PM
|
|||
|
|||
|
Tried on some exhaust tips. They still need to be lined up. They don't look too bad. Spacers are on. It look much wider in person.
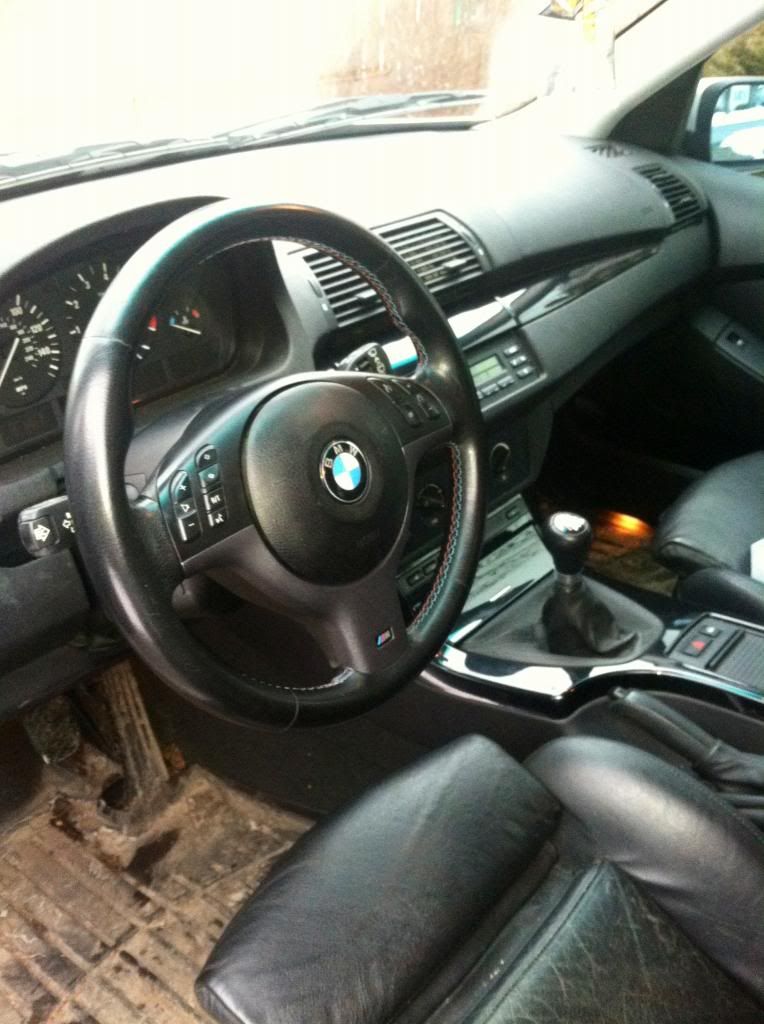
The interior needs a serious Leatherique clean. Tri-stitch is flithy and the grip on the steering wheel has a sheen. Once she's out of the shop its clean time.   
__________________

|
|
#1794
02-18-2013, 02:18 PM
|
||||
|
||||
|
Quote:
__________________
 2006 4.4i Jet black on black. 20" staggered 87's 2006 4.4i Jet black on black. 20" staggered 87's 
|
|
#1796
02-19-2013, 05:03 PM
|
|||
|
|||
|
Quote:
The exhaust tips are made by Superior and they are polished stainless steel. They are bolt-on with rolled edges. Its a round straight cut. The model # is 28-4101.
__________________
|
|
#1797
02-19-2013, 05:13 PM
|
||||
|
||||
|
^^trim the inners & Get some high temp black and paint the insides of your new ones....it'll finish them off nicely! Look good so far though!

__________________
2004 X5 3.0i Mod list: Currently Longer than the maximum allowed characters that can be typed here... 
|
|
#1798
02-20-2013, 08:21 PM
|
|||
|
|||
|
Quote:
__________________
|
|
#1799
02-21-2013, 09:40 PM
|
|||
|
|||
|
I know some of you will hate this but I wanted to try something out. I despise ambers. I haven't made a finally decision on exactly what the final outcome will be but this may very well be the look that stays.
I took apart the facelift headlights. Originally I didn't want to cut them but I tried to bake them open twice and failed. I kept ruining the assembly so I decided cutting the assemblies open instead. With my extra assembly I pulled out the amber lens first. Just like X5SND said, the headlight looked so naked and awkward. Plus the black plastic holder showed the holes. It wasn't working. After a little bit of looking around I saw people pulled these out and painted them. I wanted to try it out so I taped off the clear deflector and painted the reflector part a silver chrome from one of those arts and crafts rattle cans but the finish was definitely not as advertised, not even close. I sanded the paint off and used some white/clear reflector self-adhesive film but it was just a touch too transparent and you could see the amber behind it. I kept trying but I couldn't get the inside cut of that U shape to come out crisp so I tried removing the clear indicator deflector lense in the middle. With some dremeling I finally took that deflector out. It didn't look as naked. It didn't look too bad. The paint didn't look like something that would sit inside a headlight assembly so I sanded the paint off again and remembered I had some left over Di-Noc in Brushed Aluminum. Its a really nice film and the grain really gives the perception of metal. I wrapped the amber U piece in the film and it came out pretty nice but it looked a little too simple. I grabbed that white/clear reflector film and cut out a little triangular piece that would work with the lines. In different angles it looks the same color as the aluminum and in other there is a hard contrast, exactly how a reflector would work. I'm a little bit on the fence about this whole thing but it might stay. The front lense that you see is my spare that has some overspray on the lense. I think once I clean it up it should come out okay. I also have silver/chrome stealth indicator bulbs to help take out that egg-yolk look. Feel free to leave any feedback, good or bad.   
__________________
|
|
#1800
02-21-2013, 09:49 PM
|
||||
|
||||
|
better than amber in my opinion! Did you cut them open with a dremel? give us more details on the disassembly of the lenses for sure. I don't see why if you clean up the cuts and use oci-butyl sealant that they should hold up just fine, hell if you arent going to open them up again you could always plastic weld them back together too.
__________________
2018 Ram 2500 6.7L Cummins 68RFE 19k miles -Bright White/Black - Big Horn Sport - Crew Cab Short Bed 2013 X5 35D (CEO's) - Born on 5/17/2013 - 82k miles - Alpine White/Cinnamon Brown/Premium Pkg, Sport Activity/Premium Pkg and Sound/20" Style 214/Running Boards
|
|
| Bookmarks |
|
|
|
|


 Linear Mode


